High-temperature tensile deformation behavior and failure mechanisms of Al-10Si-Mn-Mg high-pressure die-cast alloy
Copyright © The Korean Society of Marine Engineering
This is an Open Access article distributed under the terms of the Creative Commons Attribution Non-Commercial License (http://creativecommons.org/licenses/by-nc/3.0), which permits unrestricted non-commercial use, distribution, and reproduction in any medium, provided the original work is properly cited.
Abstract
To investigate the high-temperature thermomechanical properties of the aluminum alloy AlSi10MnMg (AA365), a high-temperature tensile test was conducted over a wide range of temperatures (273 K to 773 K). The tensile strength of the AA365 alloy decreased from 299 MPa to 10 MPa as the temperature increased. The tensile strain increased from 12.4 % at 273 K to 44.6 % at 673 K. The microstructural observation showed that the effect of intermetallic compounds increased rapidly with the increase in temperature. This effect led to the strengthening effect caused by disturbing the dislocation movement and was considered as the reason for the increase in yield strength. A sudden decrease in tensile strength was caused by re-dissolution of secondary phases owing to the increase in temperature near the melting point. Through the fractography analysis, it was revealed the mechanism of rapid fracture occurred by the micro-cavities induced ductility failure.
Keywords:
AA365, High-temperature tensile test, Microstructure, Intermetallic compound, Fracture mechanism1. Introduction
Aluminum alloys with high corrosion resistance and lightweight properties have recently been in demand with a trend of eco-friendly materials and a reduction in car weight. AlSi10MnMg (AA365) is an Al-Si alloy made from low Fe content, and has low density, good castability, and superior mechanical properties. Hence, it is widely used in the automotive industry as cylinder heads, suspension parts, and engine room parts [1]-[5]. AA365 alloy automotive parts are produced in large quantities through high-pressure die-casting (HPDC) as it is easy to manufacture complex shapes and is capable of mass production. Improved mechanical and thermal properties of Al alloys make it possible to be used as an engine part. Therefore, Al alloy parts are exposed to high-temperature environments for a long period [6]-[8]. However, due to the inferior mechanical and thermal properties compared to steel, Al alloy parts exposed to high-temperature environments may experience unexpected failure and deformation.
Al alloy parts can cause fatal defects and lead to premature failure owing to microspores, shrinkage cavities, and formation of oxides and coarse intermetallic compounds during the highpressure die-casting process. These defects produce cracks around intermetallic compounds owing to stress concentration, and have a detrimental effect on the mechanical properties [1]-[3]. The oxidation of Al alloy during the high-pressure die-casting process produces oxides and other defects that decrease its ductility [4]. Despite the flaws, die-cast Al parts have good process efficiency and dimensional accuracy [5]. The high temperature behavior of high-pressure die-cast AA365 alloys should be studied to ensure reliability in various industrial areas and harsh working environments.
The microstructure of Al-Si alloys consists of α-Al phase, eutectic Si phase, and various intermetallic compounds. A typical Fe intermetallic compound, β-Al5SiFe, is responsible for stress concentration and degradation of mechanical properties owing to its low binding force, brittleness, and needle-type geometry [6][7]. To avoid the formation of these compounds, manganese is used as an alloying element. Mn can change the shape of intermetallic compounds by transforming the β-Al5SiFe phase into Al15(FeMn)3Si2. As a result, excellent high-temperature strength and creep resistance of alloy can be obtained [8]-[10].
Research on the high-temperature properties of various Al alloys and heat treated alloys is actively underway [11]-[14]. However, information on the high-temperature behavior of AlSi10MnMg alloys with low Fe content (0.1 wt. %) is limited. To investigate the high-temperature behavior of AlSi10MnMg alloys, this study conducted high-temperature tensile tests ranging from room temperature to near the melting point of the alloy. Based on the high-temperature tensile test results, the microstructure and intermetallic compounds of Al alloy specimens for each temperature were analyzed using SEM, EDS, and EPMA. Additionally, by analyzing the fracture surface of the specimen at each temperature, the mechanical properties of die-cast Al alloys in high-temperature environments were studied by identifying the fracture mechanism.
2. Experimental method
AlSi10MnMg (AA365) alloys using high-pressure die-casting were produced by Rio Tinto (USA). The chemical composition of this alloy was measured using the SpectroMaxX Spectrometer Al – 10.6 wt.% Si – 0.7 wt.% Mn – 0.28 wt.% Mg – 0.1 wt.% Fe – 0.08 wt.% Ti and 0.003 wt.% or less Ni, Cr, Ga, Sr and V. For high-temperature tensile tests, sub-size specimens of AA365 alloys were manufactured in accordance with ASTM E8. To analyze the high-temperature mechanical properties, the high-temperature tensile tests were conducted using the Instron 5982 Materials Testing System at 273 K, 373 K, 473 K, 573 K, 673 K, and 773 K, respectively. To analyze the microstructure of the AA365 alloy, the specimens were polished up to 2400 grit SiC abrasive cloth and then polished using 0.25 μm diamond suspension followed by 0.04 μm colloidal suspension. The microstructure of the specimen was identified by field emission secondary electron microscopy (FE-SEM; MIRA3, Tescan) using an acceleration voltage of 15.0 kV. For intermetallic compounds and phase analysis, energy dispersive spectroscopy (EDS, EDAX) and electron probe micro analysis (EPMA; JEOL, JXA-8230) were used.
3. Results and Discussion
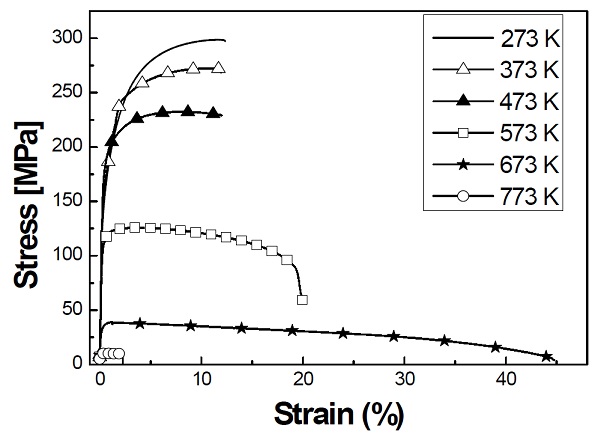
Figure 1 shows the stress-strain curve acquired from the high-temperature tensile tests. The yield strength, tensile strength, and strain obtained at each temperature are shown in Table 1. The tensile strength of the AA365 alloy decreased from 299 MPa to 10 MPa as the temperature increased. The tensile strain of the specimen increased from 12.4 % at 273 K to 44.6 % at 673 K. However, at 773 K, the highest test temperature near the melting point, it showed a 2.2 % strain with very fast fracture and the lowest tensile strength of 10 MPa. The strain rate of AA365 alloy at 273 K was 12.4 %, whereas, at 373 K and 473 K, it exhibited a relatively low value of 11.9 % and 13.0 %, respectively, considering the effect of temperature. The failure can occur quickly by brittle intermetallic phases and microvoids. A large amount of intermetallic phases was investigated by increasing the temperature up to 473 K, as shown in Figure 4. It acted as the initiation and propagation of cracks that caused the fracture of the material [15][16].

Tensile strength, yield strength, and tensile strain of HPDC AA365 aluminum alloy after tensile test at room temperature (273 K), 373, 473, 573, 673, and 773 K.
The yield strength increased from 146 MPa to 181 MPa as the temperature increased from 273 K to 473 K. It was assumed that the AA365 alloy quenched after die-casting yielded various intermetallic compounds as the temperature increased, which hindered the movement of dislocations and increased the yield stress [17]. Additionally, as the temperature increased, it was confirmed that the yield strength decreased as the precipitates began to melt.
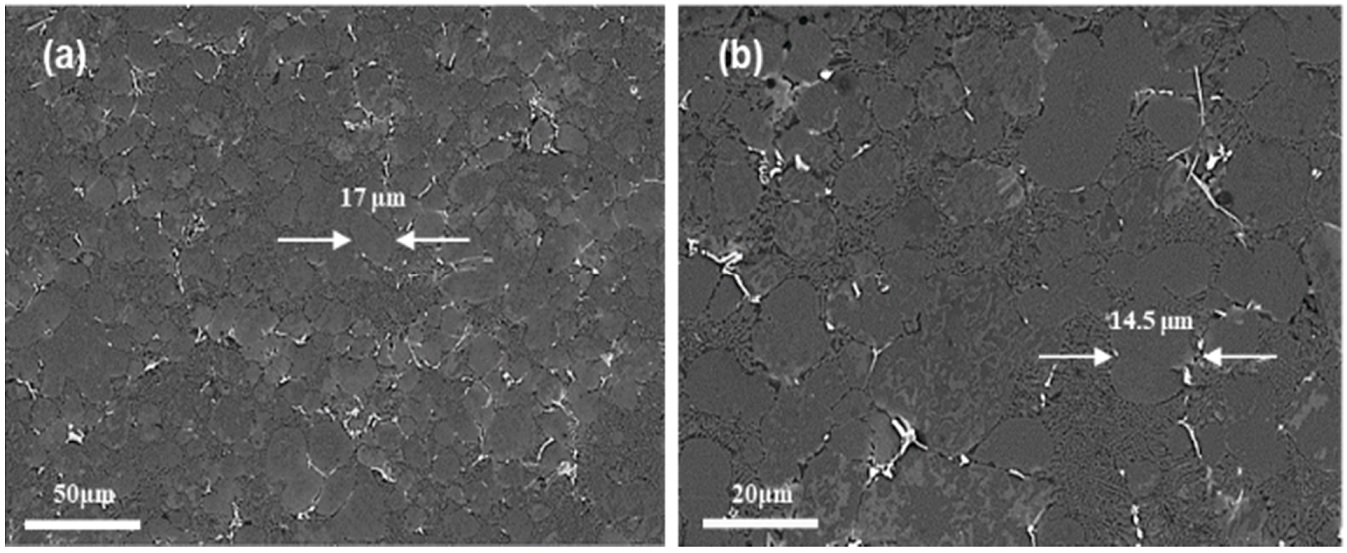
Figure 2 shows the microstructure of the AA365 alloy cast by HPDC process. As shown in Figure 2 (a) and Figure 2 (b), the grain size of the AA365 cast was approximately 15 μm, and most of the intermetallic compounds were produced around the Al-Si eutectic phase. However, owing to the rapid cooling during the HPDC process, the generation and growth of secondary phases were inhibited. Hence, a relatively small size and amount of intermetallic compounds were produced compared to other casting methods.

(a) Microstructure of the as casted high-pressure die-casting AA365 aluminum alloy, and (b) SEM image at higher magnification
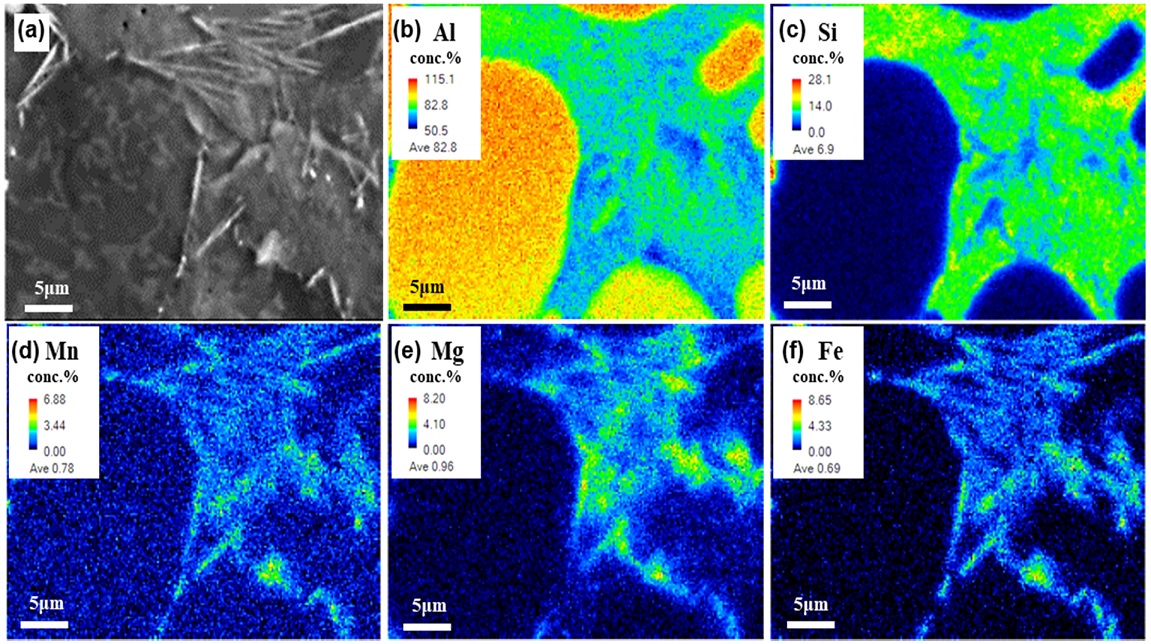
The needle shape of the secondary phase was identified through microstructure observation, as shown in Figure 3. The intermetallic compounds were identified by β-Al5SiFe, α-Al15(Mn,Fe)3Si2, and π-Al8Mg3FeSi6 (Chinese script) [6]. It confirmed that the unstable high energy of grain boundaries promoted the production of intermetallic compounds relatively more in grain boundaries than in the intergranular area.

(a) Scanning electron image and chemical element quantitative map of AA365 alloy after creep test: (b) Al, (c) Si, (d) Mn, (e) Mg, and (f) Fe
Figure 4 shows the microstructure of an AA365 alloy subjected to high-temperature tensile tests at 373 K, 473 K, and 573 K, and confirmed a relatively large amount of intermetallic compounds compared to the tensile specimen at 273 K. It can be observed from Figure 4 (a) that the tensile specimen of AA365 alloy at 373 K has a relatively larger size of the secondary phase near the Al-Si eutectic phase compared to the tensile test specimen at 273 K.

Microstructure of AA365 aluminum alloy after high temperature tensile test at (a) 373 K; (b) 473 K; and (c) 573 K
Figure 4 (b) shows the microstructure of AA365 alloy after the tensile test was performed at 473 K. The result indicates that the length and density of the secondary phase increased significantly than that at 373 K. The strengthening effect from the rapidly increased intermetallic compound as barrier to the dislocation movement can be achieved. This was also confirmed from the yield strength of 181 MPa at 474 K, which increased from 146 MPa at 373 K. Additionally, Figure 4 (c) confirms the dissolution and decrement of secondary phases with the increase in temperature. In Figure 4 (b), where the maximum intermetallic compounds were produced, it can be observed that the intermetallic compounds were generated inside the grain boundary as well. Additionally, it was confirmed that the size of the grains between 10 ~ 30 μm was not significantly affected by the temperature.
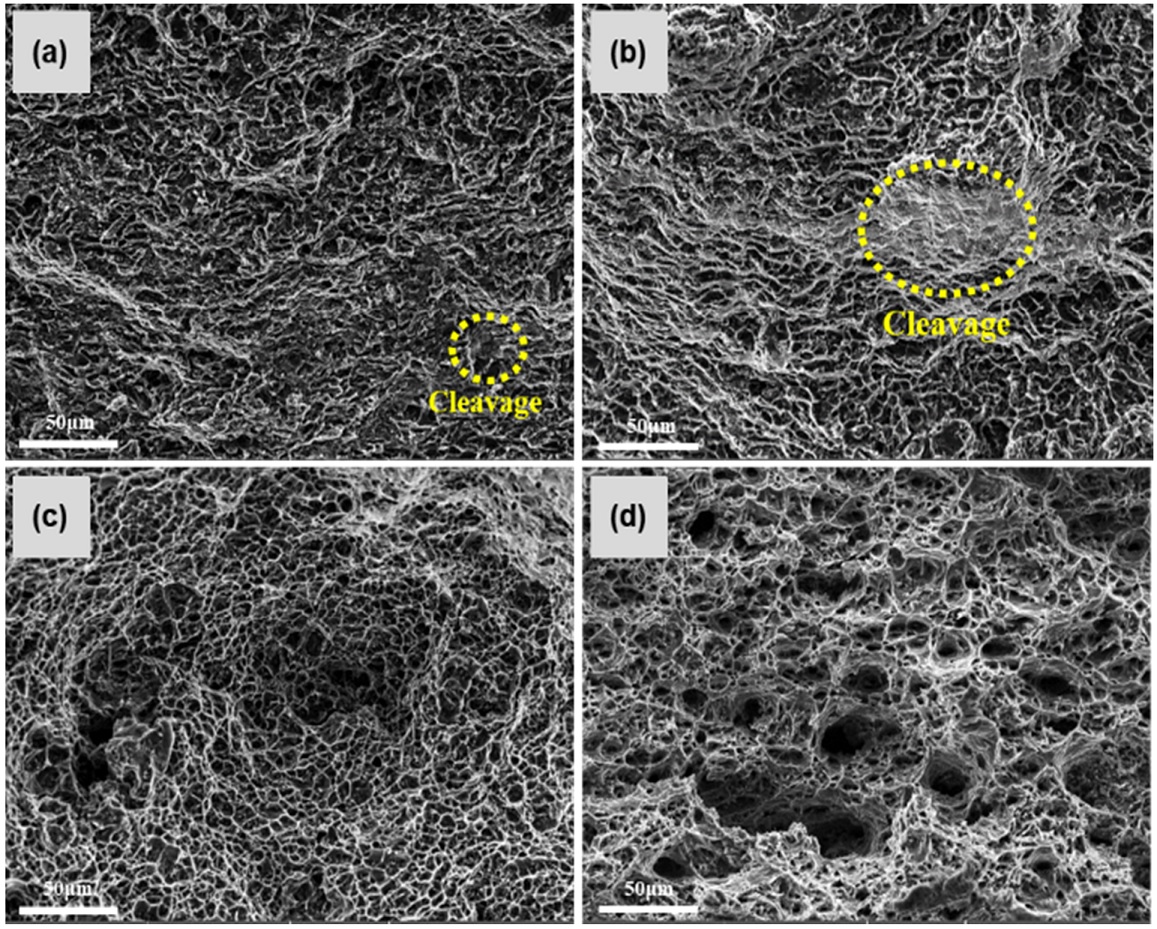
Figure 5 shows the fracture surface of AA365 alloy specimens after conducting the high-temperature tensile test at each temperature. All fracture surfaces exhibited a ductile fracture. The fracture surface of the specimen tested at 373 K (Figure 5 (a)) showed a dimple and clear ductile fracture in the upper part. However, it also showed transgranular fracture with a dimple and quasi-cleavage in the lower part. Figure 5 (b) shows the fracture surface of the 473 K specimen. The quasi-cleavage surface and dimple was clearly visible. In the fracture surface of the 573 K specimen (Figure 5 (c)), it was confirmed that the dimple was formed by the effect of micro-cavity and ductile fracture. The fracture surface of the 673 K specimen (Figure 5 (d)) exhibited a larger number of cavities compared to other specimens. This confirmed that destruction occurred quickly due to the coalescing of the micro-cavities.
4. Conclusion
The high-temperature tensile tests were conducted over a wide temperature range, ranging from 273 K to 773 K, to investigate the high-temperature thermomechanical properties of AA365 alloy. The tensile strength of the AA365 alloy decreased from 299 MPa (273 K) to 10 MPa (673 K) as the temperature increased. The tensile strain increased from 12.4 % at 273 K to 44.6 % at 673 K. In the temperature range between 373 and 473 K, it was found that the amount of secondary phase was drastic. The yield strength increased from 146 MPa to 181 MPa as the temperature increased from 373 K to 473 K. It could be due to the strengthening effect that hindered the movement of dislocations and increased the yield strength. The effect of redissolved secondary phases led to a sudden decrease in tensile strength by increasing temperature near the melting point. From the fractography, the evidence of ductile fracture was revealed as dimple, transgranular fracture, and quasi-cleavage. It confirmed the mechanism of rapid fracture occurred by the micro-cavities induced ductility failure.
Acknowledgments
This work was supported by Dong-Eui University Grant. (201902160001).
Author Contributions
Conceptualization, I. Jo and E. Lee; Methodology, I. Jo and E. Lee; Software, I. Jo; Validation, C. Ahn and E. Lee; Formal Analysis, I. Jo and C. Ahn; Investigation, I. Jo and C. Ahn; Resources, I. Jo; Data Curation, C. Ahn and E. Lee; Writing—Original Draft Preparation, I. Jo; Writing—Review & Editing, C. Ahn and E. Lee; Visualization, I. Jo and E. Lee; Supervision, E. Lee; Project Administration, E. Lee; Funding Acquisition, E. Lee;
References
-
G. Timelli and A. Fabrizi, “The effects of microstructure heterogeneities and casting defects on the mechanical properties of high-pressure die-cast AlSi9Cu3 (Fe) alloys,” Metallurgical and Materials Transactions A, vol. 45, no. 12, pp. 5486-5498, 2014.
[https://doi.org/10.1007/s11661-014-2515-7]

-
A. Niklas, A. Bakedano, S. Orden, M. da Silva, E. Nogués, and A. I. Fernández-Calvo, “Effect of microstructure and casting defects on the mechanical properties of secondary AlSi10MnMg (Fe) test parts manufactured by vacuum assisted high pressure die casting technology,” Materials Today: Proceedings, vol. 2, no. 10, pp. 4931-4938, 2015.
[https://doi.org/10.1016/j.matpr.2015.10.059]

-
A. A. AKM, and H. Kato, “Influence of casting defects on tensile properties of ADC12 aluminum alloy die-castings,” Materials transactions, vol. 49, no. 7, pp. 1621-1628, 2008.
[https://doi.org/10.2320/matertrans.F-MRA2008814]

-
A. Niklas, S. Orden, A. Bakedano, M. da Silva, E. Nogués, and A. I. Fernández-Calvo, “Effect of solution heat treatment on gas porosity and mechanical properties in a die cast step test part manufactured with a new AlSi10MnMg (Fe) secondary alloy,” Materials Science and Engineering A, vol. 667, pp. 376-382, 2016.
[https://doi.org/10.1016/j.msea.2016.05.024]

-
T. Jaglinski and R. Lakes, “Creep behavior of Al-Si die-cast alloys,” Journal of Engineering Materials and Technology, vol. 126, no. 4, pp. 378-383, 2004.
[https://doi.org/10.1115/1.1789953]

-
E. Lee, C. Walde, and B. Mishra, “Effects of Cooling Rate on Precipitate Evolution and Residual Stresses in Al–Si–Mn–Mg Casting Alloy,” Metals and Materials International, vol. 24, no. 4, pp. 815-820, 2018.
[https://doi.org/10.1007/s12540-018-0094-7]

-
C. Ahn and E. Lee, “Effect of cooling rate on the corrosion resistance and mechanical property of AlSi10MnMg alloy,” Journal of the Korean Society of Marine Engineering, vol. 43, no. 8, pp. 618-624, 2019.
[https://doi.org/10.5916/jkosme.2019.43.8.618]

- J. E. Gruzleski, and B. M. Closset, “The treatment of liquid aluminum-silicon alloys,” American Foundrymen's Society. Inc. Des Plaines, Illinois, USA, pp. 1-35, 1990.
-
E. Samuel, A. M. Samuel, H. W. Doty, S. Valtierra, and F. H. Samuel, “Intermetallic phases in Al–Si based cast alloys: new perspective”, International Journal of Cast Metals Research, vol. 27, no. 2, pp. 107-114, 2014.
[https://doi.org/10.1179/1743133613Y.0000000083]

-
L. A. Narayanan, F. Samuel, and J. Gruzleski, “Crystallization behavior of iron-containing intermetallic compounds in 319 aluminum alloy,” Metallurgical and Materials Transactions A, vol. 25, no. 8, pp. 1761-1773, 1994.
[https://doi.org/10.1007/BF02668540]

-
H. Toda, T. Nishimura, K. Uesugi, Y. Suzuki, and M Kobayashi, “Influence of high-temperature solution treatments on mechanical properties of an Al–Si–Cu aluminum alloy”, Acta Materialia, vol. 58, no. 6, pp. 2014-2025, 2010.
[https://doi.org/10.1016/j.actamat.2009.11.044]

-
Z. H. Yuan, Z. P. Guo, and S. M. Xiong, “Microstructure evolution of modified die-cast AlSi10MnMg alloy during solution treatment and its effect on mechanical properties,” Transactions of Nonferrous Metals Society of China, vol. 29, no. 5, pp. 919-930, 2019.
[https://doi.org/10.1016/S1003-6326(19)65001-6]

- R. Molina, P. Amalberto, and M. Rosso, “Mechanical characterization of aluminium alloys for high temperature applications Part1: Al-Si-Cu alloys,” Metallurgical Science and Tecnology, vol. 29, no. 1, pp. 5-15, 2011.
-
J. Onoro, M. Salvador, and L. Cambronero, “high-temperature mechanical properties of aluminium alloys reinforced with boron carbide particles,” Materials Science and Engineering A, vol. 499, no. 1-2, pp. 421-426, 2009.
[https://doi.org/10.1016/j.msea.2008.09.013]

- J. A. Taylor, “The effect of iron in Al-Si casting alloys,” 35th Australian foundry institute national conference, Adelaide, South Australia, vol. 31, pp. 148-157, 2004.
-
X. Cao and J. Campbell, “Morphology of β-Al5FeSi phase in Al-Si cast alloys,” Materials Transactions, vol. 47, no. 5, pp. 1303-1312, 2006.
[https://doi.org/10.2320/matertrans.47.1303]

-
R. R. Ambriz and D. Jaramillo, “Mechanical behavior of precipitation hardened aluminum alloys welds,” Light Metal Alloys Applications, IntechOpen, 2014.
[https://doi.org/10.5772/58418]


