Finite element analysis of the rotary swaging process for pointing hydrogen embrittlement-resisted steel rods
Copyright © The Korean Society of Marine Engineering
This is an Open Access article distributed under the terms of the Creative Commons Attribution Non-Commercial License (http://creativecommons.org/licenses/by-nc/3.0), which permits unrestricted non-commercial use, distribution, and reproduction in any medium, provided the original work is properly cited.
Abstract
We conducted finite element (FE) analysis to develop a rotary swaging process to form the pointing part of hydrogen embrittlement-resistant steel rods. First, the shape and dimensions of the pointing section were determined by considering the drawing stress based on Geleji's equation. Second, the rotary swaging process was designed as a two-pass operation to disperse the excessive deformation of the drawn rods. Finally, the validity of the proposed two-pass schedule was verified by observing the dimensional changes in the pointed section, effective strain/stress distribution, and critical normalized damage value during the rotary swaging process.
Keywords:
Rotary swaging process, Hydrogen embrittlement-resisted steel, Pointing operation, Finite element analysis1. Introduction
The initial steel rod used in the drawing process must undergo preliminary metal working, i.e., pointing at the front of the rod, to pass through the drawing die and clamp to the hydraulic jig. The pointing process is usually performed through machining; however, recently, the pointing operation has been accomplished through a metal forming process, such as rotary swaging, to increase the recovery rate of steel rods and prevent fracture of the pointed section during the shape-drawing process.
Rotary swaging is an incremental forming process that has attracted attention since the early 2000s. Swaging is a non-cutting metal-forming process that deforms the cross-sectional shape of rods and tubes to manufacture long parts with the same cross-section. Moreover, swaging is economical as it is mainly suitable for mass-producing products with circular, square, and tapered profiles. In addition, swaging mills are simple and are easily accessible by unskilled workers. Swaging, which can be applied to forming most metallic materials, enables a clear material-saving effect because it restricts chip generation for the raw materials. Owing to its fiber structure, the mechanical properties of swaged metal, such as tensile/compressive/bending strength and surface hardness, are improved.
Research on the rotary swaging process in domestic industries became active in the late 1990s. Lim et al. [1] experimentally studied the forming characteristics of a rotary swaging process. When manufacturing a rod shaft, the effects of process variables, such as forming speed, thickness-to-diameter ratio, type of materials (rod, tube), and reduction in area during swaging on the dimensional accuracy, thickness variation, and hardness increase of the swaged rad shaft, were investigated. Kim et al. [2] proposed a finite element (FE) model to analyze the swaging process, in which the work was performed under a mechanically unbalanced state using an inclined die set. Kim et al. [3] applied a rotary swaging process to manufacture automotive cowl crossbars. They performed a computer-aided engineering (CAE) analysis to verify the process design and successfully manufactured a prototype cowl crossbar. Lim et al. [4] used a practical TRIZ technique to improve the efficiency of a punch-type rotary swaging process, a metal-forming process for automotive drive shafts. Song et al. optimized the swaging processing conditions of a plate-type fuel assembly using the Taguchi method [5]. Most recent studies have focused on improving the mechanical properties and refining the microstructure of steel pipes via the swaging process [6-8].
However, most research has focused on the rotary swaging process of tube materials, with almost no research on the swaging process of rod materials, especially on applying rotary swaging to the pointing operation before the multi-pass shape drawing process. Considering rod swaging mostly depends on the experience of field workers, defect prevention and new product development require high costs and time. Therefore, a more systematic process design method is required to address these problems.
This study aims to design a rotary swaging process for the pointing operation of hydrogen embrittlement-resistant steel rods. The diameter of the pointing section required to prevent material fracture in the multi-pass shape-drawing process was calculated using a design method that considers the drawing stress. FE analysis was performed on a two-pass swaging process to inform the forming process of a pointing part with the required diameter, with the dimensional accuracy, effective strain/stress distribution, and critical damage value analyzed.
2. Design of Pointing Section to Prevent Initial Rod Fracture in Shape Drawing Process
2.1 Tensile Test
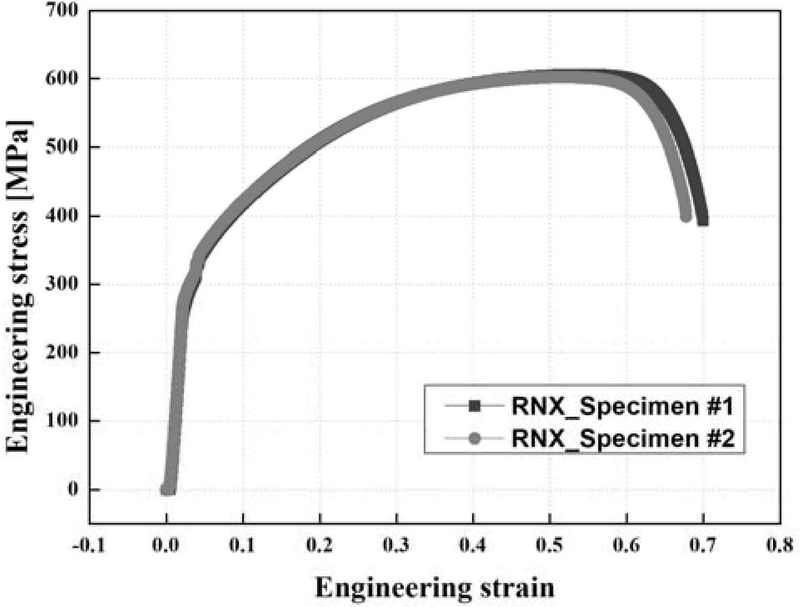
The mechanical properties of the initial rod material were determined through tensile tests, with the test result under a strain rate of 0.001 s-1 used for determining the stress–strain curve, as shown in Figure 1. The rod material used was RNX, a hydrogen embrittlement-resisted steel, with yield stress, ultimate tensile stress, modulus of elasticity, and Poisson’s ratio of 290 MPa, 604 MPa, 200 GPa, and 0.3, respectively. The flow stress–strain relationship was obtained as follows:
| (1) |
Additionally, the critical damage value Dc for RNX was defined in the normalized Cockcroft–Latham model as follows:
| (2) |
| (3) |
where ε is the equivalent plastic strain, εf is the equivalent strain to fracture, σ is the equivalent stress, and σmax is the maximum principal tensile stress, respectively. This model determines the probability of fracture owing to tensile plastic deformation by considering the contribution of plastic work to failure. The material was considered to have failed when the normalized critical value reached a constant Dc. The normalized critical value of RNX was determined to be 0.51 from the experimental and FE analysis results of the uniaxial tensile test.
2.2 Design of Pointing Section
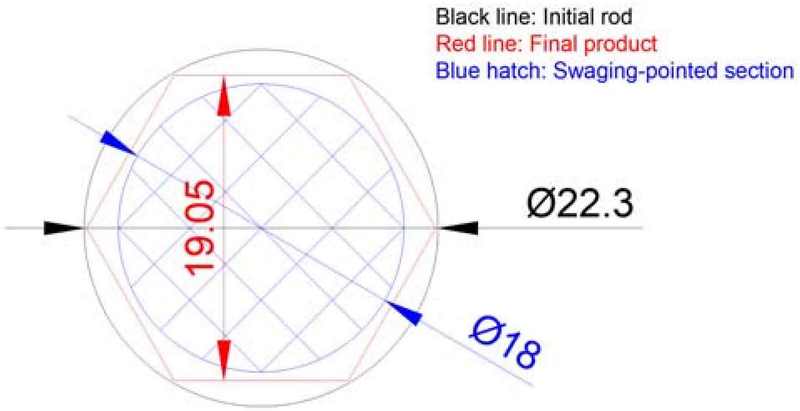
The cross-sectional shape of the pointed part must be designed to prevent material fractures during the multi-pass shape-drawing process. In this study, rotary swaging was selected as the forming method; therefore, the cross-sectional shape of the pointed part was circular, with its diameter determined by considering the drawing stress. Figure 2 shows the cross-section of the hexagonal rod (a drawn product), the initial material cross-section, and the swaged-pointed section.
In this study, drawing stress was calculated using a cross-sectional method (CSM) based on Geleji's equation [9][10]. The drawing force is expressed in Equation (4) below.
| (4) |
where Z(N) is the drawing force, km(MPa) is the average deformation resistance of the material, kfm(MPa) is the mean yield strength, F(mm2) is the difference in cross-sectional area between the die inlet and outlet, μ is the friction coefficient, Q(mm2) is the contact area between the die and material, f2(mm2) is the cross-sectional area of the die outlet, and α(rad) is the half die angle.
The drawing stress, σd(MPa), can be expressed using the above drawing force, Z (N), and the cross-sectional area of the die outlet, f2 (mm2), as in Equation (5).
| (5) |
If the drawing stress calculated using the cross-sectional area of the swaging-pointed section instead of that of the die outlet is lower than the average deformation resistance of the material at the die outlet during the shape drawing process, stable drawing processing is possible. The main input values required to calculate drawing stress are as follows:
- ① Mechanical properties and dimensions of the initial rod: strength coefficient of 1283.22 MPa, strain-hardening coefficient of 0.439, diameter of 22.3 mm
- ② Drawing die: rod diameter of 18.0 mm (assumed to be the diameter of the swaging-pointed section), face–face length of 19. 0 mm, half die angle of 15°, friction coefficient of 0.0577
The theoretical analysis results using the CSM indicated that the stress generated in the swaging-pointed part during the shape-drawing process was 314.2 MPa, slightly lower than the average deformation resistance (321.7 MPa) when the final product, a hexagonal rod with a face-to-face length of 19.05 mm, was drawn in a single pass. Therefore, if the pointing part is rotary swaged to 18 mm, no fracture defects will occur in the pointing part of the steel rod during the multi-pass shape-drawing process.
3. Finite Element Analysis
3.1 3D-FE Modeling
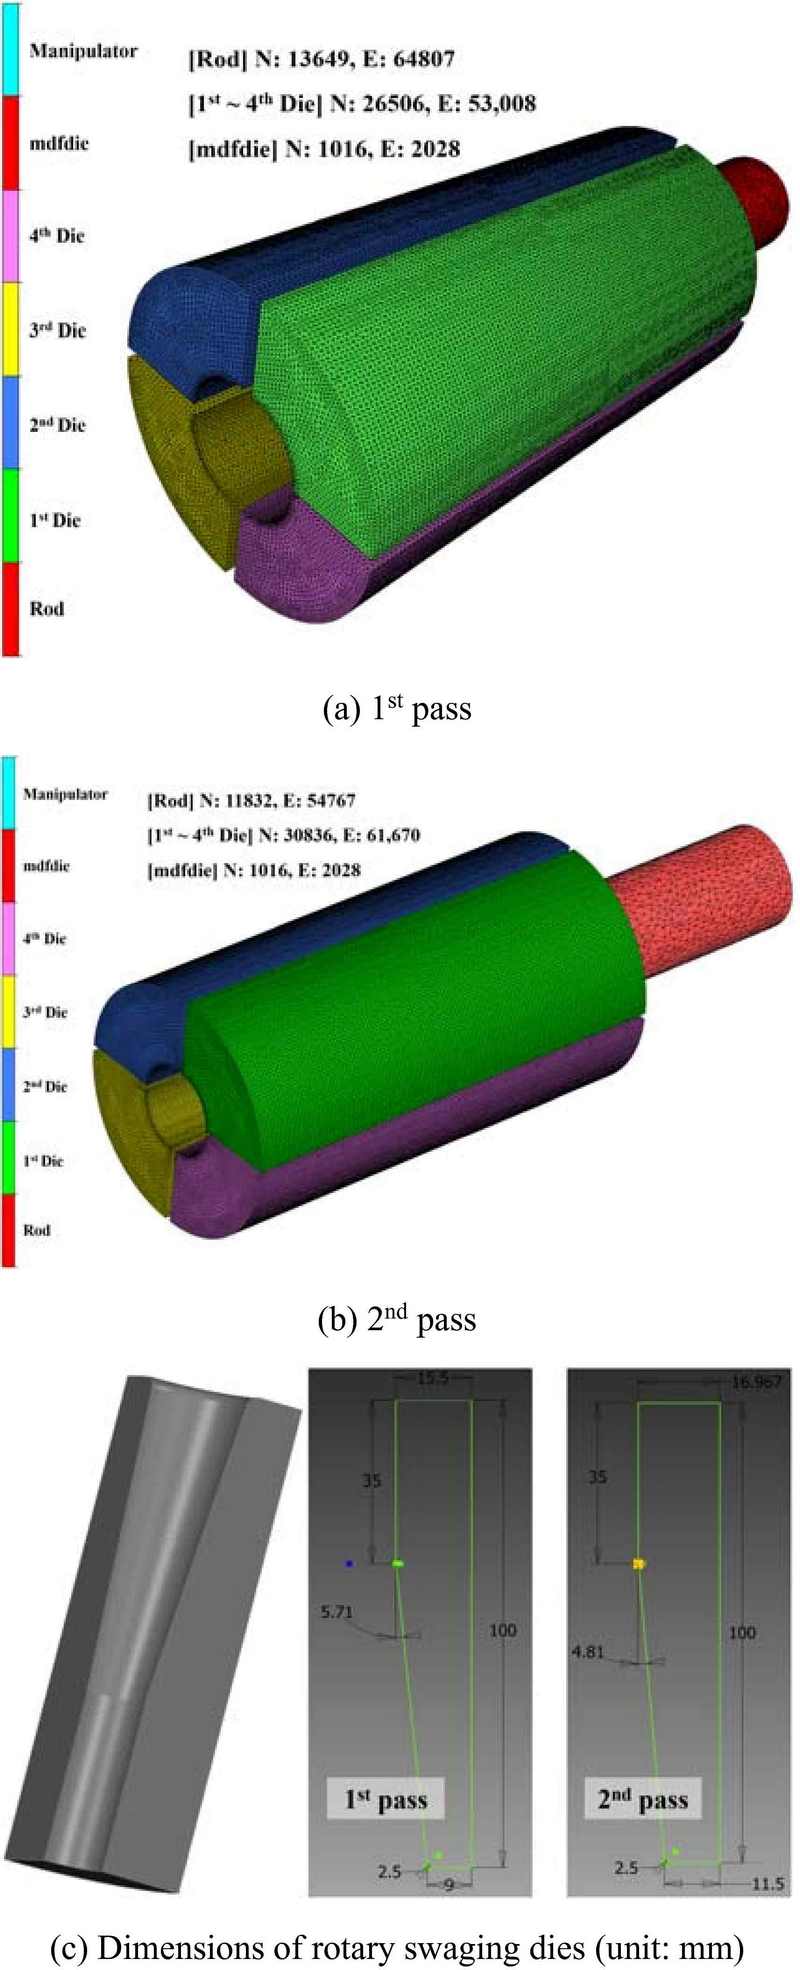
To verify the diameter of the proposed pointing section, we developed a 3D-FE model for the rotary swaging process using FORGE-Nxt 3.2, as shown in Figure 3. The FE model for the rotary swaging process consists of four dies that apply a compressive force to the steel rod, an mdfdie that defines the rod transport and rotation motion of the dies, and the initial steel rod.
To minimize computation time, the initial length of the steel rod in the 1st pass of the rotary swaging process was set to 100 mm. The mesh structure of the FE model was tetrahedral, with the number of elements and nodes of the rod discretized to 64,807 and 13,649, respectively. The flow-stress equation for the initial material used in the FE is given by Equation (1). The die was considered a rigid body, with its mesh structure constructed with 53,008 initial tetrahedral elements. The mdfdie macro file was used to reflect the repeated rotation and compression motions of the dies and the progressive feeding motion of the rod in the FE analysis modeling. Additionally, the rod deformed in the 1st pass was used in the FE model of the 2nd pass swaging process. The input parameters required for the FE modeling are listed in Table 1. The rotary swaging process is performed at a relatively high speed; however, the acceleration effect is ignored, with the rigid-plastic material assumed to follow the von Mises yield criterion and the related flow rule. From the moment of initial contact between the rod material and die slope to the convergence of the FE analysis, computation is mechanically impossible if no rear holder is present. In actual industrial equipment, the role of the rear holder is replaced by a fixture or manpower. In contrast, in FE modeling, the computation time is reduced by using the manipulator function to maintain mechanical equilibrium.
3.2 Results and Discussion of FE Analysis
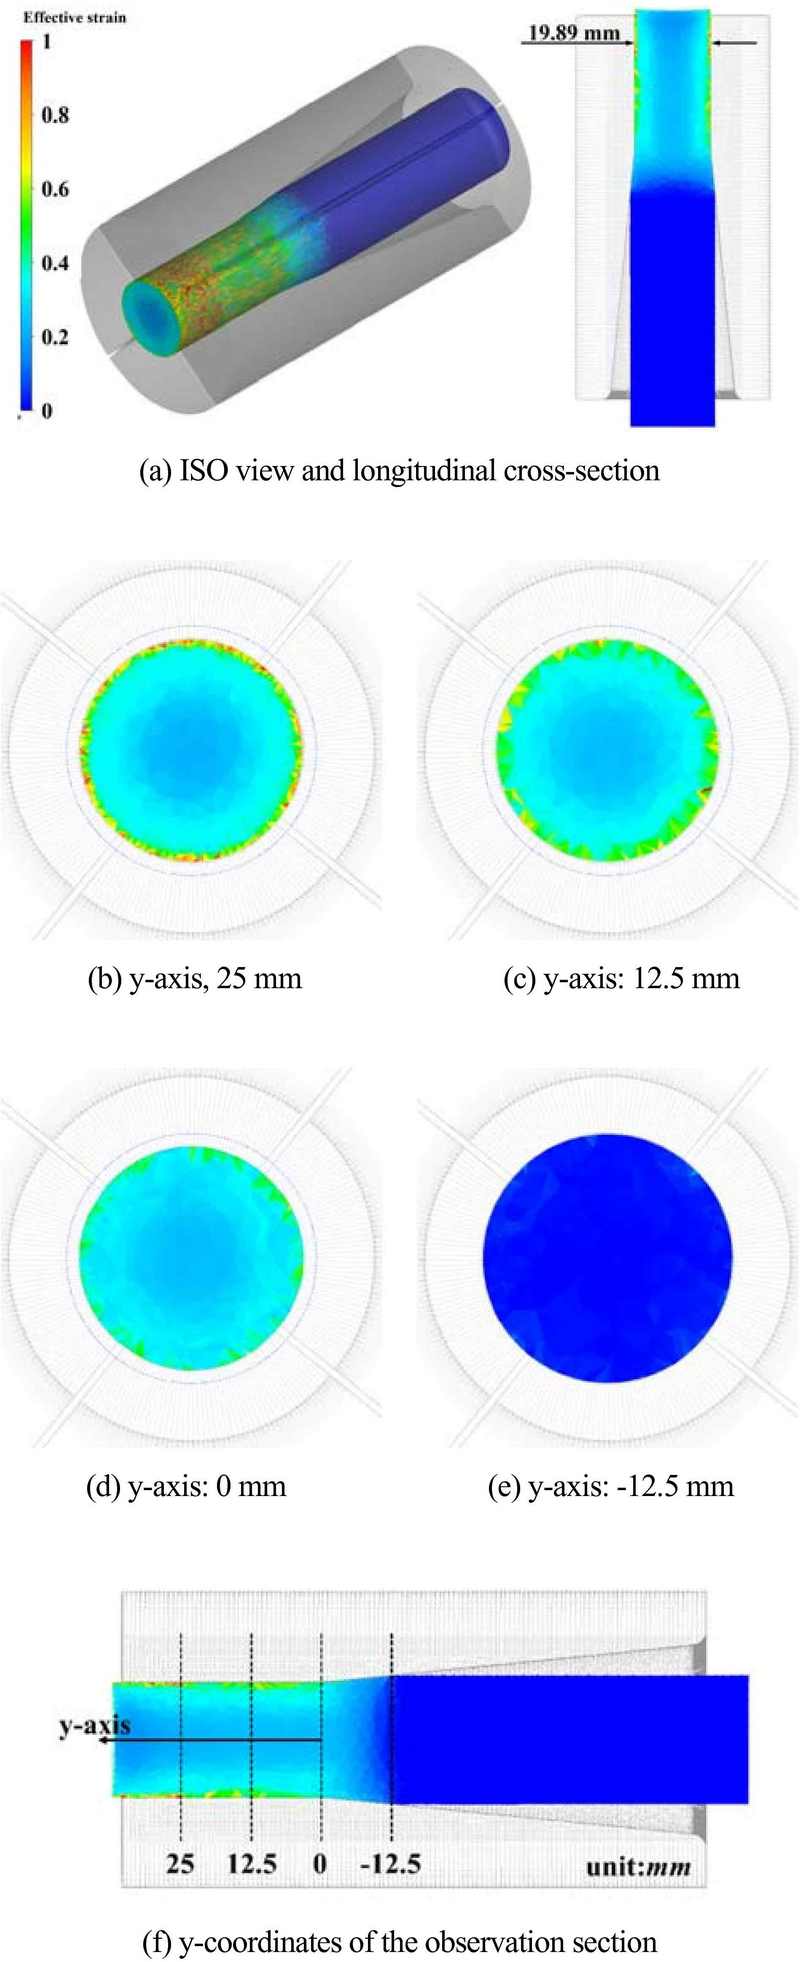
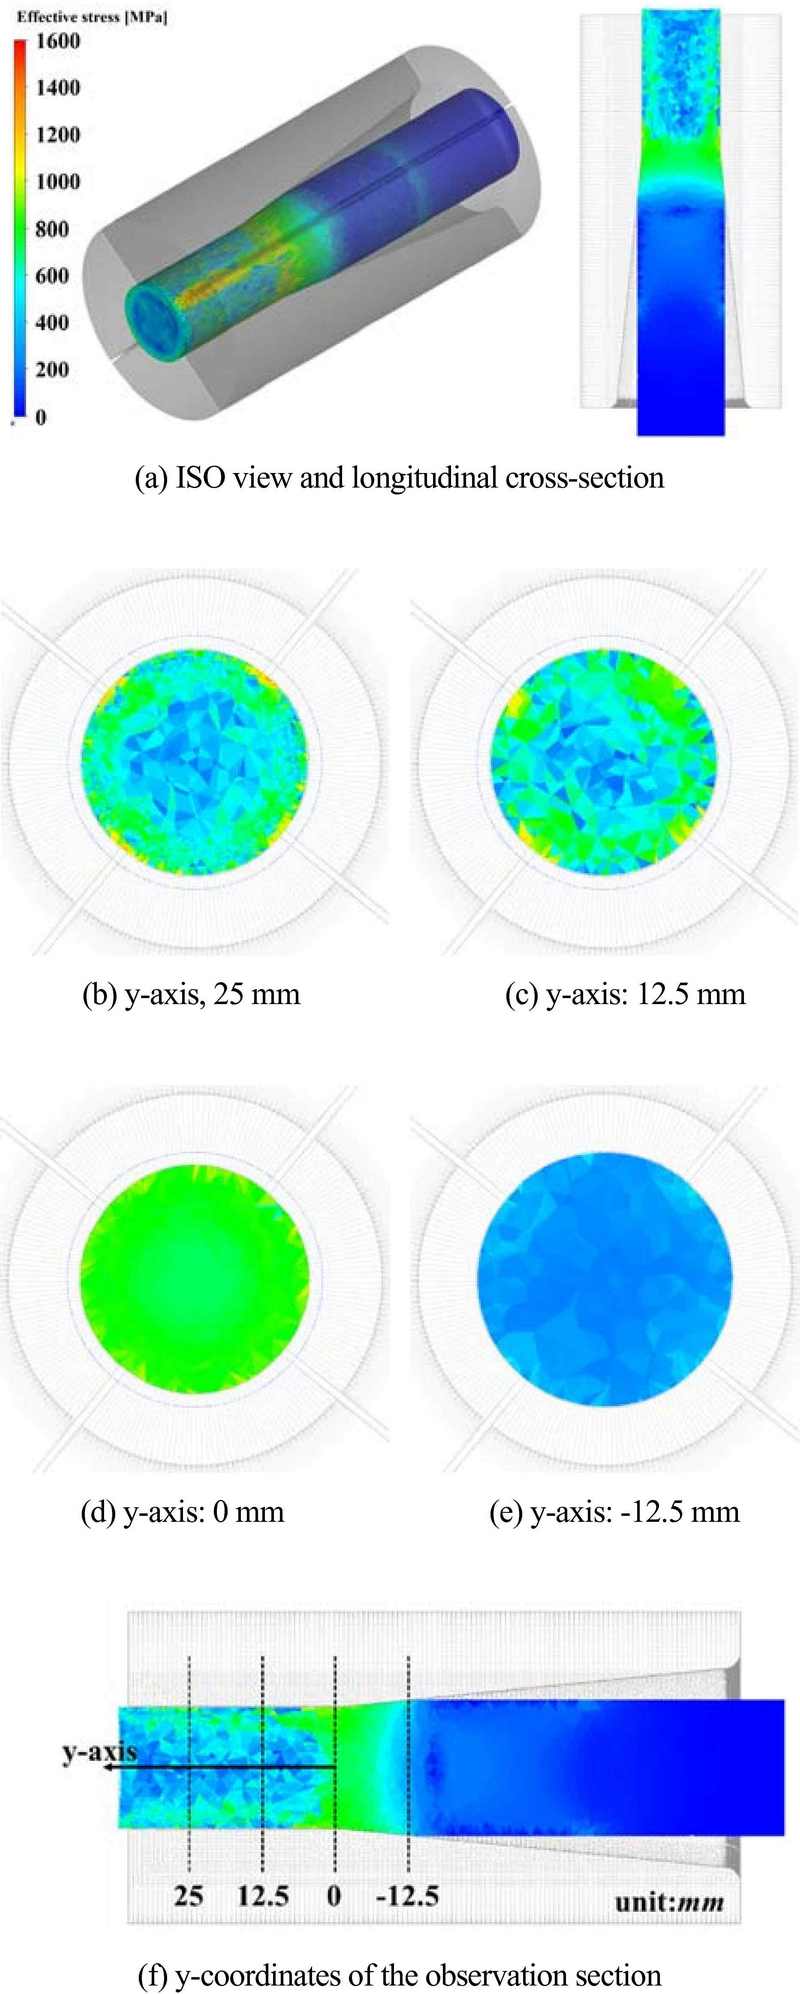
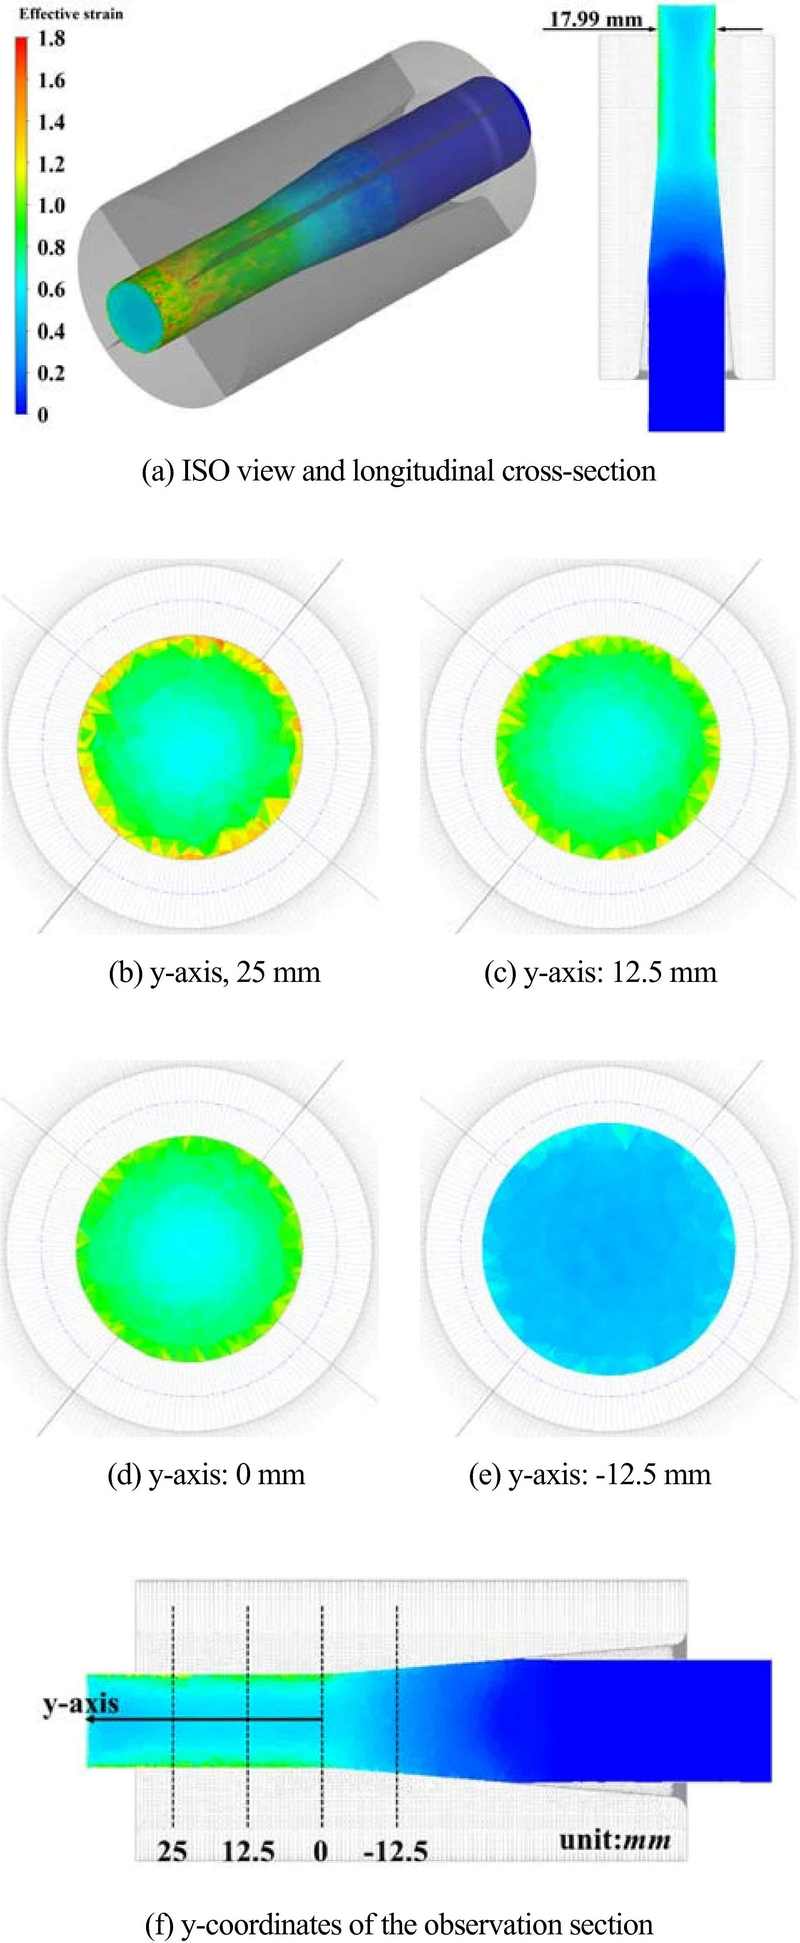
Figure 4 and Figure 5 show the effective strain and stress distributions of the 1st deformed rod in the rotary swaging process. Most of the plastic deformation occurred on the outer surface of the swaged rod, with the stress distribution almost uniform in the circumferential direction. After the convergence of the FE analysis for the 1st rotary swaging process, the observed maximum effective strain and maximum effective stress were 0.97 and 1,322 MPa, respectively. The diameter of the swaged steel rod was 19.89 mm, almost the same as the design value of 20 mm.
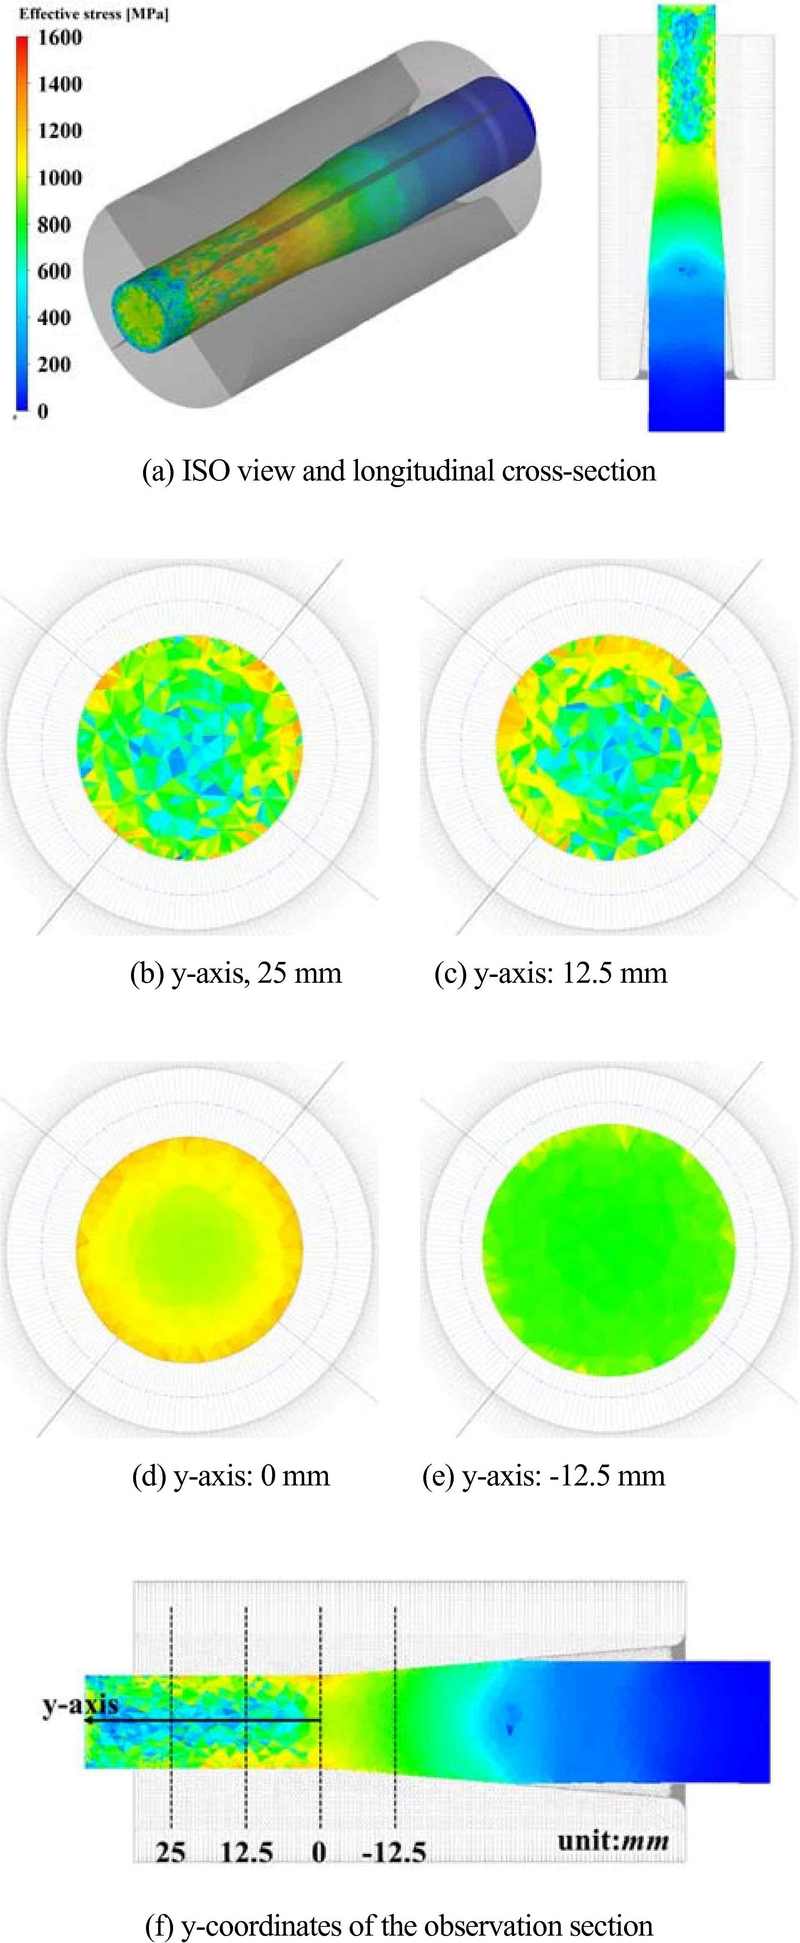
Figure 6 and Figure 7 show the effective strain and stress distributions of the 2nd deformed rod in the rotary swaging process. The plastic deformation tendency of the 2nd swaged steel rod was similar to the 1st pass FE analysis results. The plastic deformation zone can more easily penetrate the rod from the surface to the center by increasing the amount of radial feed per pass. The observed maximum effective strains and stresses were 1.65 and 1,520 MPa, respectively, after the convergence of the FE analysis for the 2nd rotary swaging process. The diameter of the swaging-pointed part with an overall uniform deformation was 17.99 mm, the same as that in the design.
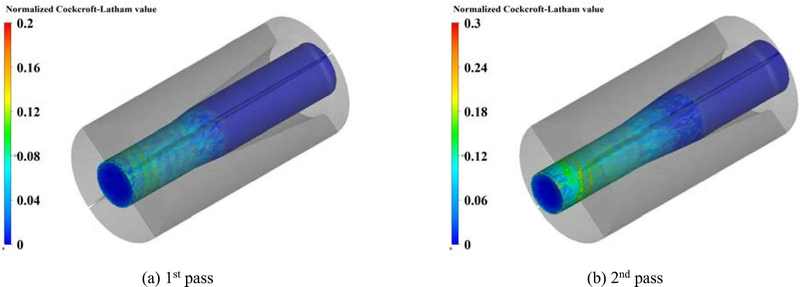
Figure 8 shows the distribution of normalized damage after the rotary swaging process. After the second pass, the maximum damage value (0.23) after the 2nd pass is below the critical value of RNX (Dc). The proposed shape and dimensions of the pointing part and pass schedule of the rotary swaging process provided high dimensional accuracy and a sound product with a low critical damage value.
4. Conclusion
In this study, FE analysis was performed to form the pointing part of an initial rod material, a hydrogen embrittlement-resistant steel, by applying a rotary swaging process.
- (1) Based on flow stress calculation using the CSM, the diameter of the rotary-swaged pointed section, which enables a stable shape-drawing process of a hexagonal rod, was proposed to be 18 mm.
- (2) The designed diameter of the pointing part and two-pass operation schedule of the rotary swaging process to disperse the excessive deformation of the initial rods resulted in high dimensional precision and a sound pointing part with an overall uniform deformation in the circumferential direction and a low critical damage value of 0.23.
Acknowledgments
This research was supported by the technology transfer and commercialization Program through INNOPOLIS Foundation funded by the Ministry of Science and ICT. (2023-BS-RD-0026-02/The localization of technical development of shape fusion machining to improve yield rate of manufacturing process for instrumentation fittings with 95% or higher degree of hydrogen embrittlement sensitivity).
Author Contributions
Conceptualization, S. K. Hong and K. H. Lee; Methodology, S. K. Hong and K. H. Lee; Software, K. H. Lee; Validation, S. K. Hong, J. H. Son and K. H. Lee; Investigation, H. E. Cheon and S. M. Pyo; Data Curation, J. H. Son, H. E. Cheon and S. M. Pyo; Writing—Original Draft Preparation, S. K. Hong; Writing—Review & Editing, K. H. Lee; Visualization, K. H. Lee; Supervision, K. H. Lee.
References
- S.-J. Lim, D.-J. Yoon, and K.-H. Na, “The forming characteristic of rotary swaging process,” Journal of the Korean Society for Technology of Plasticity, vol. 7, no. 5, pp. 432-238, 1998 (in Korean).
-
M.-C. Kim, J.-G. Eom, S.-J. Lim, H.-J. Choi, and M.-S. Joun, “Finite element analysis of tube swaging,” Transactions of Materials Processing, vol. 21, no. 3, pp. 160-163, 2012 (in Korean).
[https://doi.org/10.5228/KSTP.2012.21.3.160]

-
H.-S. Kim and J.-W. Youn, “Development of one-piece manufacturing process for automotive cowl cross bar using rotary swaging,” Transactions of Materials Processing, vol. 25, no. 5, pp. 332-337, 2016 (in Korean).
[https://doi.org/10.5228/KSTP.2016.25.5.332]

-
D.-J. Lim, W.-J. Chung, S.-S Sul, D.-Y. Kim, K.-S. Choi, and T.-H. Cha, “A study on rotary swaging process simulation using DEFORM,” Journal of the Korean Society of Manufacturing Process Engineers, vol. 18, no. 6, pp. 106-112, 2019 (in Korean).
[https://doi.org/10.14775/ksmpe.2019.18.6.106]

-
H.-Y. Song, S.-C. Kwon, Y.-J. Jeong, S.-I. Choi, and S.-H. Park, “Optimization of swaging process of plate-type fuel assembly using design of experiments,” Transactions of the Korean Society of Mechanical Engineers A, vol. 45, no. 10, pp. 899-904, 2021 (in Korean).
[https://doi.org/10.3795/KSME-A.2021.45.10.899]

-
Q. Mao, Y. Liu, and Y. Zhao, “A review on mechanical properties and microstructure of ultrafine grained metals and alloys processed by rotary swaging,” Journal of Alloys and Compounds, vol. 896, 163122, 2022.
[https://doi.org/10.1016/j.jallcom.2021.163122]

-
H. Chen, C. Hu, F. Hu, X. Liu, F. Kong, W. Xie, G. Wei, Y Yang, X. Peng, Y. Huang, and N. Hort, “Effect of rotary swaging on the microstructure and mechanical properties of high-strength Mg-Mn-Al-Ca-Zn alloys,” Materials Characterization, vol. 196, 112575, 2023.
[https://doi.org/10.1016/j.matchar.2022.112575]

-
Q. Mao, L. Wang, J. Nie, and Y. Zhao, “Optimizing strength and electrical conductivity of 6201 aluminum alloy wire through rotary swaging and aging processes,” Journal of Materials Processing Technology, vol. 331, 118497, 2024.
[https://doi.org/10.1016/j.jmatprotec.2024.118497]

-
T.-K. Lee, C.-J. Lee, S.-K. Lee, and B.-M. Kim, “Prediction of drawing load in the shape drawing process,” Transactions of Materials Processing, vol. 18, no. 4, pp. 323-328, 2009 (in Korean).
[https://doi.org/10.5228/KSPP.2009.18.4.323]

-
S.-K. Lee, I.-K. Lee, and S.-Y. Lee, “Development of a multi-pass drawing process design system for steel profile,” Materials, vol. 11, no. 12, pp. 1-17, 2018.
[https://doi.org/10.3390/ma11122446]


