Pass schedule design in multi-pass tube drawing process by advanced strain control model
Copyright © The Korean Society of Marine Engineering
This is an Open Access article distributed under the terms of the Creative Commons Attribution Non-Commercial License (http://creativecommons.org/licenses/by-nc/3.0), which permits unrestricted non-commercial use, distribution, and reproduction in any medium, provided the original work is properly cited.
Abstract
The multi-pass tube drawing process is primarily used to manufacture long hollow components during the metal forming process. The housing of the servomotor is a typical component manufactured using a multi-pass tube drawing process. Many studies have been conducted on the pass schedule of the multi-pass drawing process for solid-type steel rods; however, there has been little research on the pass schedule for hollow-type steel tubes. Therefore, the objective of this study is to design a pass schedule for the multi-pass tube drawing process based on an advanced strain control model and drawing force prediction. The key parameters of the strain-control model are the ratio of the drawing strain between passes and the thickness of the drawn tubes at each pass. The drawing forces during the multi-pass plug drawing process were theoretically calculated using Geleji’s equation to enable their prediction, and the calculated values at each pass closely agreed with the finite element (FE) analysis results. As a result of the FE analysis, the proposed pass schedule can provide adequate dimensional accuracy for the drawn products.
Keywords:
Multi-pass tube drawing, Strain-control model, Ratio of drawing strain, Drawing force, Finite element analysis1. Introduction
The housing, which is one of the case parts of the servo motor, is manufactured using 304 stainless steel tubes, noted for their high strength and corrosion resistance, and high dimensional accuracy is required. Previously, a seamless steel tube was used as the raw material for the servomotor housing. Nevertheless, with advancements in welding, metal forming, and post-processing technologies, a semi-seamless steel tube can now be manufactured. Accordingly, research has been conducted to develop a net-shape-forming technology for manufacturing sound-drawn parts at low production costs. Among the various manufacturing processes, performing the tube-drawing process in multi-pass is advantageous for preventing material fracture, improving product dimensional accuracy, and extending die life.
The tube drawing process is generally performed within two to three passes, considering the formability of the initial material, reduction in area, and productivity. To manufacture tubes with the required quality, it is important to design an appropriate pass schedule. The mechanical properties of the tube material, strain at each pass, and changes in the outer diameter and thickness of the tube are key process variables when designing the pass schedule. Most pass schedule designs have been developed through trial-and-error methods that depend on the expertise of field experts; however, more effective process design methods are now being proposed. Lee et al. [1] developed a drawing strain distribution model using a simple two-stage tube drawing process and proposed a crack prediction index for drawn steel pipes. However, it has the disadvantage of limiting the cross-sectional reduction ratio for each pass to the same value, making it inapplicable to actual industrial sites. Yoshida and Furuya [2] proposed optimal tube drawing conditions for manufacturing fine Ni-Ti tubes with respect to drawing limit, surface roughness, axial residual stress, and dimensional accuracy. Lee et al. [3] observed that the cause of ductile fracture when forming a steering input shaft tube was an increase in the strain energy of the curvature of the drawing die using finite element (FE) analysis. Accordingly, a straight axial cross-sectional profile is proposed to design a tube drawing die. An et al. [4] analyzed the effects of drawing die and plug angle changes on the dimensions and effective stress distribution of ultra-high-pressure common rail fuel injection tubes during the plug drawing process. Consequently, it was discovered that the plug angle was more important than the half-die angle, prompting additional research to optimize the plug angle. Cheon et al. [5] developed a novel methodology for designing an intermediate die profile in the tandem drawing process to improve the dimensional accuracy of rectangular stainless-steel bars. Part et al. [6] developed a free-surface profile prediction model based on response surface analysis and FE simulation. They applied this to the design of a rectangular roll-die drawing process. Kim et al. [7] proposed a novel design method for an intermediate drawing die using an equal-radial-velocity variation method (ERV method) to minimize the unfilled defects. The effectiveness of the ERV method was verified by FE analysis and shape drawing experiments in comparison with the conventional design method, which is an electric field analysis method used in the multi-pass shape drawing process. Park and Lee [8] developed an advanced force prediction method that considers redundant deformation in the shape drawing process. The predicted forces were assessed using the developed method and an FE analysis for a multi-pass shape drawing process to manufacture rectangular and hexagonal products.
The multi-pass drawing process, a net shape-forming technology, is performed as the second or higher drawing process. Although much research has been conducted on drawing force and drawing stress, no numerical standard has yet been presented to control the drawing strain for each pass. Accordingly, problems such as fractures, dimensional changes, and distortion could occur in the tube drawing process due to inappropriate fieldwork. In this study, an advanced strain-control model for the multi-pass tube drawing process was developed. This control model was applied to a drawing force prediction model based on Geleji’s equation to design a novel pass schedule for the multi-pass tube drawing process. The proposed design model was verified using finite element (FE) analysis for manufacturing 304 stainless steel tubes in a three-pass drawing process.
2. Pass Schedule Design
2.1 Advanced Strain Control Model
A mathematical model based on area reduction was developed to control the strain for each pass in the three-pass tube drawing process. The total strain (εt) in the three-pass tube drawing process is determined using Equation (1).
| (1) |
where A0 and A3 are the areas of the initial tube billet and the final drawn product in the three-pass tube drawing process, respectively.
The drawing strain for each pass, εi, is expressed by Equation (2):
| (2) |
where Ai is the cross-sectional area of the product drawn at each pass and Di, and ti are the outer diameter and thickness of the tube at each drawing pass, respectively. For i = 1, 2, and 3, the following equations are obtained:
| (3) |
The ratio of drawing strain, ηi, between passes is expressed using Equation (4).
| (4) |
Equation (4) can be summarized with respect to the cross-sectional area as follows:
| (5) |
Substituting Equation (3) into Equation (5) gives the following.
| (6) |
By controlling the ratio of the drawing strain, the drawing strain and cross-sectional area of the drawn tubes for each pass can be determined. In this study, we develop a mathematical model that can control the ratio of drawing strain to improve the dimensional precision of drawn tubes for sound manufacturing. Heat treatment to relieve the work hardening of the tube material is generally performed after each drawing process.
In a previous study, a pass schedule was proposed by setting the strain ratio to one in a two-pass drawing process [1]. However, to prevent fractures in the drawn tube product and achieve excellent dimensional accuracy, a reverse taper pass schedule is necessary, which progressively reduces the reduction in area with each pass as the tube drawing progresses. When the ratio of the drawing strain for each pass was set to less than 1, a reverse taper pass schedule was created. Additionally, if η1 can be set relatively higher than η2, it is advantageous for improving the stable deformation and dimensional accuracy because the strain can be minimized in the final drawing pass. Accordingly, in this study, η1 and η2 were set to 0.9 and 0.8, respectively, in the three-pass tube drawing process. Using equations from Equation (1) to Equation (4), ε2, ε1 and ε3 are calculated sequentially. In the multi-pass drawing process, the inner diameter, outer diameter, and thickness of the tube were simultaneously deformed. Among the dimensional variables, the thickness was set as the reference value, and the inner and outer diameters for each pass were calculated using the strain values calculated using Equation (2), the predetermined thickness, and Equation (6). At this time, the thickness of the drawn tubes at each pass was determined as the strain ratio between the instantaneous strain and total strain (εi/εt).
2.2 Drawing Force Prediction Model
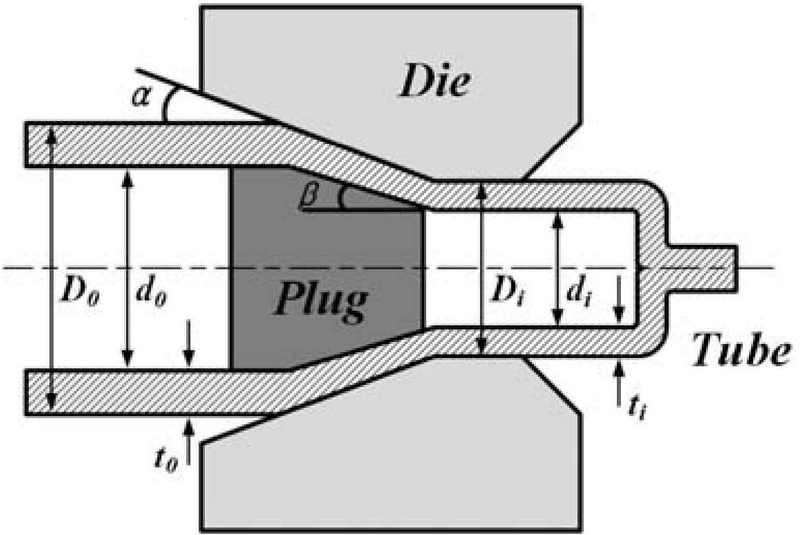
Drawing force is important information required to set the deformation stress of the material, prevent fractures, and establish optimal drawing conditions. In previous studies, the drawing force was predicted using the upper-bound, lower-bound, and slab methods. More recently, FE analysis has been widely used. However, it is not easily applied in industrial fields due to practical problems, such as the complexity of understanding related software, excessive analysis time, and the need to reconstruct a FE model when the process variables change. In this study, the required load during the tube-drawing process was calculated using Geleji’s equation, and the process was designed based on this calculation. The principal process variables used to calculate the forming load during drawing are shown in Figure 1. The forming load of the plug drawing process can be calculated using Equation (7) [9].
| (7) |
where, Zi is the tube drawing load, km,i is the average deformation resistance of the tube, Fi is the difference between cross-sectional areas of the tube at the inlet and outlet of the die, μi is the friction coefficient, Qdi is the contact area between the die and tube, Qp,i is the contact area between the plug and tube, fe,i is the cross-sectional area of the tube at the outlet of the die, kfmi is the mean yield strength of the tube, and αi is the semi-die angle.
The material properties used to obtain the average deformation resistance and mean yield strength were determined through tensile tests. The flow stress equation of the annealed 304 stainless steel tube is given by Equation (8).
| (8) |
2.3 Application of Models
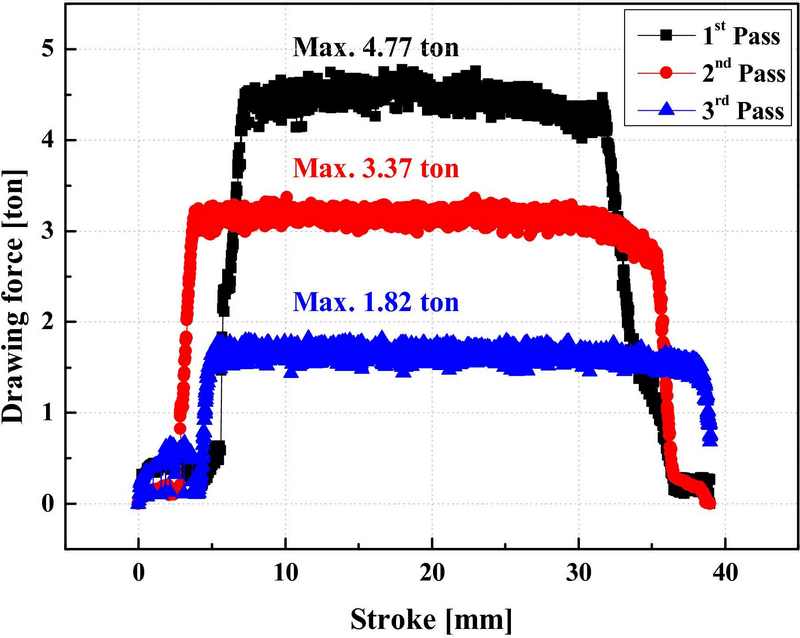
The initial and final outer diameters of the tube were 44.5 mm and 39.9 mm, and the initial and final thicknesses of the tube were 1.1 mm and 0.67 mm, respectively, representing a total reduction in area of 59.7%. The semi-die angle (α) and plug angle (β) are 14° and 8°, respectively. The pass schedule of the designed three-pass tube drawing process using the strain-control model is listed in Table 1. The drawing strains for each pass were designed as 0.228, 0.205, and 0.164. The tube drawing forces calculated using Equation (7) were 4.49 tons, 2.94 tons, and 1.57 tons, respectively. The proposed drawing strain and calculated drawing force were much lower than the typical tube drawing conditions and the allowable loads of 50 tons for onsite drawing equipment, which are expected to result in a stable manufacturing try-out.
3. Finite Element Analysis
To verify the effectiveness of the proposed models in the multi-pass tube drawing process, FE analysis was performed using the pass schedule designed by the advanced strain control model.FE analysis was conducted using the FORGE Nxt 3.2 software environment.
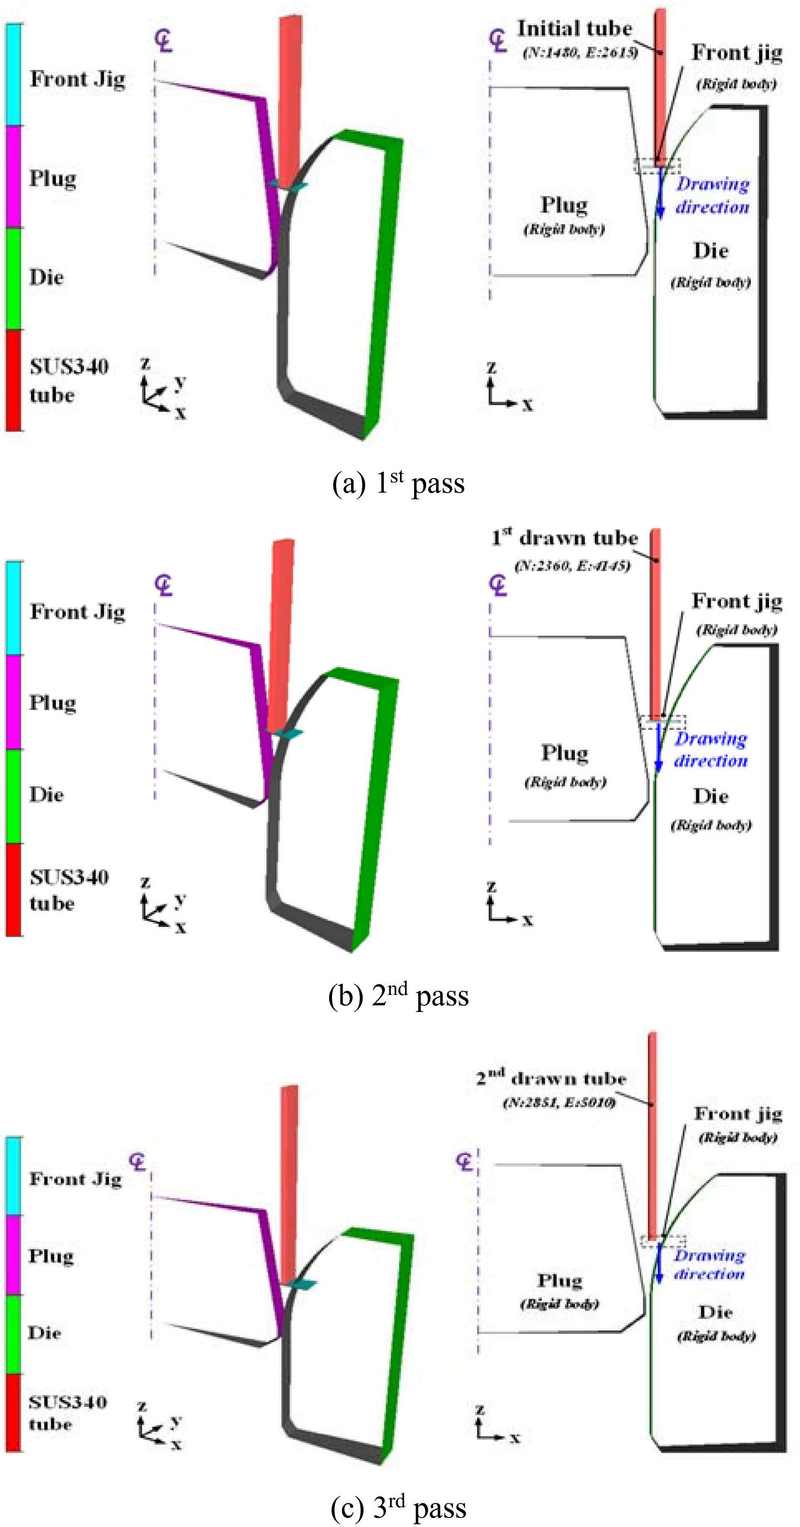
Figure 2 shows the FE analysis model of the multi-pass tube drawing process. A 2D-axisymmetric model of the entire shape was created by considering the symmetry of the drawn tubes. The initial material was 304 stainless steel with a diameter of 44.5 mm, a thickness, and a length of 80 mm, and the initial temperature was at room temperature. The mesh structures of the FE models at each pass were constructed using 2,615, 4,145, and 5,010 initial tetrahedral elements, respectively. The dies and plugs were considered rigid bodies, and the workpiece was pulled along the drawing direction (-z direction) by a front zig. The friction coefficient between the tube and the tool was fixed at 0.057, and the drawing speed was 10 mm/s [5][7]-[8]. Equation (8) represents the flow stress used in the FE analysis. The pre-strain of the workpiece at each pass was set to zero due to annealing before the tube drawing process.
The results of the FE analysis of the three-pass tube drawing process are summarized in Figure 3 concerning the drawing force. The maximum drawing forces required in each pass are 4.77 tons (1st pass), 3.37 tons (2nd pass), and 1.82 tons (3rd pass). It was confirmed that the drawing force prediction model utilizing Geleji's equation proposed in Section 2.2 can accurately predict the tube drawing force.
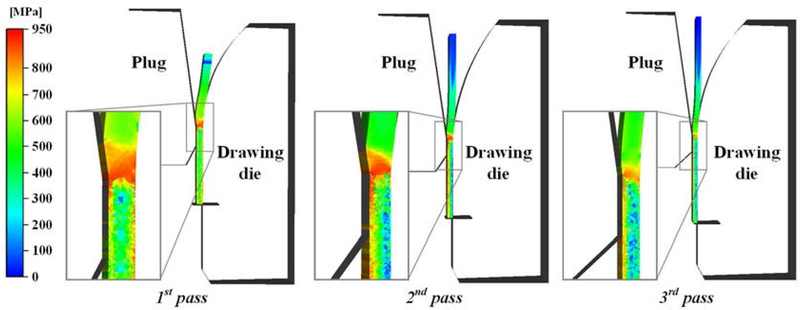
Figure 4 illustrates the effective stress distribution in the three-pass tube drawing process. The maximum effective stress was observed at the starting part of the bearing zone. The maximum values observed for the first, second, and third passes were 912 MPa (1st pass), 900 MPa (2nd pass), and 830 MPa (3rd pass), respectively. Subsequently, the tube was deformed and the stress decreased to an average value of less than 400 MPa as it passed through the bearing zone.
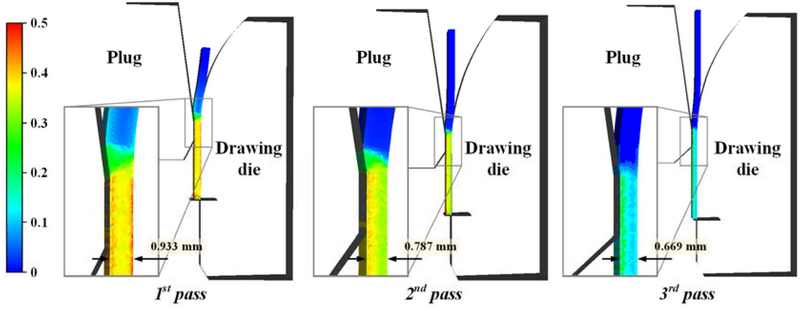
Figure 5 illustrates the effective strain distribution and thickness of the drawn tubes during the three-pass tube drawing process. The maximum effective strain was observed on the inner surface of the drawn tube that was in contact with the plug. The maximum values observed in each pass were 0.49 (1st pass), 0.44 (2nd pass), and 0.29 (3rd pass). The thickness of the deformed product after the plug drawing process was 0.669 mm, and the proposed pass schedule resulted in good dimensional precision in the multi-pass plug drawing process.
4. Conclusion
In this study, we developed a design methodology for the pass schedule in a three-pass tube drawing process based on an advanced strain control model and a drawing force prediction model. FE analysis was performed to verify the effectiveness of the proposed models, and the results were compared with the theoretical predictions for the drawing forces and tube thickness of the drawn tubes. The proposed models led to a successful plug drawing process with high dimensional precision of the drawn tubes.
Acknowledgments
This research was supported by Korea Basic Science Institute (National research Facilities and Equipment Center) grant funded by Ministry of Education. (grant No. 2022R1A6C101B738)
Author Contributions
Conceptualization, S. P. Hong and K. H. Lee; Methodology, S. C. Park and K. H. Lee; Software, S. C. Park and K. H. Lee; Validation, S. P. Hong and K. H. Lee; Investigation, E. B. Seo and K. H. Lee; Data Curation, S. C. Park and E. B. Seo; Writing—Original Draft Preparation, S. C. Park; Writing—Review & Editing, K. H. Lee; Visualization, K. H. Lee; Supervision, K. H. Lee.
References
-
D. -H. Lee, U. -C. Chung, and Y.-H. Moon, “Drawing strain distribution model for the two-pass drawing process,” Transactions of Materials Processing, vol. 13, no. 8, pp. 671-677, 2004 (in Korean).
[https://doi.org/10.5228/KSPP.2004.13.8.671]

-
K. Yoshida and H. Furuya, “Mandrel drawing and plug drawing of shape-memory-alloy fine tubes used in catheters and stents,” Journal of Materials Processing Technology, vol. 153-154, no. 1, pp. 145-150, 2004.
[https://doi.org/10.1016/j.jmatprotec.2004.04.182]

-
S. -K. Lee, H. -J. Moon, B. -M. Kim, J. -H. Lee, and Y. -S. Lee, “Process design of monobloc tube for steering input shaft in cold drawing,” Transactions of Materials Processing, vol. 14, no. 9, pp. 779-784, 2005 (in Korean).
[https://doi.org/10.5228/KSPP.2005.14.9.779]

-
S. -Y. Ahn, J. -K. Park, Y. -G. Kim, J. -P. Won, H. -S. Kim, and I. -S. Kang, “An analytical study by variation of die and plug angle in drawing process for the strength optimization of ultra high pressure common rail fuel injection tube raw material,” Transaction of Korean Society of Automotive Engineers, vol. 24, no. 3, pp. 338-344, 2016 (in Korean).
[https://doi.org/10.7467/KSAE.2016.24.3.338]

-
I. -J. Cheon, S. -C. Park, H. Park, S. -K. Hong, and K. -H. Lee, “Intermediate die profile design for high-precision production of rectangular stainless-steel bars via new tandem drawing process,” Journal of Advanced Marine Engineering and Technology, vol. 44, no. 3, pp. 223-229, 2020.
[https://doi.org/10.5916/jamet.2020.44.3.223]

-
S. -C. Park, I. -J. Cheon, H. Park, S. -K. Hong, and K. -H. Lee, “Development of a free-surface profile prediction model for multi-pass shape roll die drawing process using response surface method,” Journal of Advanced Marine Engineering and Technology, vol. 44, no. 5, pp. 367-375, 2020.
[https://doi.org/10.5916/jamet.2020.44.5.367]

-
J. -H. Kim, J. -H. Park, K. -S. Lee, D. -C. Ko, and K. -H. Lee, “Design of an intermediate die for the multi-pass shape drawing process,” Materials, vol. 15, no. 19, 6893, 2022.
[https://doi.org/10.3390/ma15196893]

-
S. -C. Park and K. -H. Lee, “Prediction method for shape drawing force considering redundant deformation,” Journal of Advanced Marine Engineering and Technology, vol. 47, no. 6, pp. 336-342, 2023.
[https://doi.org/10.5916/jamet.2023.47.6.336]

-
A. Geleji, Bildsame Formung der Mettale in Rechnung und Versuc, Berlin, Germany: Akademie-Verlag, 1960 (in German).
[https://doi.org/10.1515/9783112761915]


