Configuration design of die and plug to improve bonding strength between materials in cold drawing process of multi-layered pipes
Copyright ⓒ The Korean Society of Marine Engineering
This is an Open Access article distributed under the terms of the Creative Commons Attribution Non-Commercial License (http://creativecommons.org/licenses/by-nc/3.0), which permits unrestricted non-commercial use, distribution, and reproduction in any medium, provided the original work is properly cited.
Abstract
The steel pipes used for industrial transportation are subjected to heavy loads and often transport corrosive materials such as seawater and crude oil. To meet the requirements of such pipes used in extreme environments, special steel pipes with multi-layered structures, such as clad and lined pipes employing multi-layered materials, are required. In this study, a multi-layered bonded pipe is fabricated via mechanical bonding, resulting in the development of a new method for manufacturing lined pipes. Experiments using the Taguchi method and finite element analyses are conducted to improve the insufficient bond strength compared to metallurgical bonding. The effects of factors such as die, plug, and cross-section reduction on the bonding strength, which in turn help determine the optimal die and plug shape, are also investigated. Finally, the bonding strength of the lined pipe is compared and verified using the hydroforming process, based on an indentation strength test.
Keywords:
Clad pipe, Multi-layered materials, Taguchi method, Cold drawing, Plant industry1. Introduction
Plant facility pipes refer to industrial pipes for applications in areas such as industry (chemical processes), marine, transportation, civil, and systems. Among the many types of applications to industries, offshore plant structures, in particular, comprise two types of structures, namely structures fixed to the seafloor and structures on the water surface, depending on the environmental conditions and design variables, to which various types of pipes are applied.
In recent years, drilling and production works for the development of offshore oil and gas is shifting from shallow to regions to the deep sea. Due to this change, to transport oil or gas from the deep sea through pipelines, the pressure of crude oil or gas at the production site should be increased, offsetting the pressure drop during transit. In this aspect, the offshore plant pipe should meet the criteria of both high strength for high-pressure resistance and high corrosion resistance against corrosive materials, such as crude oil and seawater. In order to manufacture such a high specification pipe, a pipe using a special alloy needs to be manufactured, leading to an increase in raw material costs and, consequently, production costs.
Accordingly, there is a growing need for multi-layered bonding materials that use two or more materials and simultaneously use their mechanical properties to tackle the above problems. The lined pipe is a type of pipe produced using bilayered materials. The base material (outer tube) uses carbon steel with excellent strength characteristics. In contrast, special steel with excellent corrosion resistance such as stainless steel, Duplex, and Inconel is used for the corrosion-resistant alloy material (inner tube). The lined pipe has significant advantages in terms of cost as well as physical and chemical properties compared to monolayered materials [1][2].
Considering the applications of existing cladding technology, there has been a recent increase in the interest surrounding the reduction of raw materials utilized, product performance improvement, and eco-friendliness as the industry advances. To meet these demands, several different metal bonding technologies have also been developed. The American Society for Testing and Materials has also specified this type of bonding technology.
Pipes using bonding materials of dissimilar metals have been used in various applications, and a variety of research related to these types of pipes has been conducted, including the investigation of the die shape of the monolayered pipe.
Tak studied the mechanical properties of the high-frequency induction-welded section for the cold drawn processing of the BAS121 aluminum alloy for high-frequency induction-welded heat exchangers. Wang improved the hydraulic expansion device for manufacturing pipes lined with corrosion-resistant alloy (CRA) and also proposed and developed a hydraulic expansion mechanism to overcome the drawbacks of existing manufacturing technology. Shou performed a study on the shape optimization design by analyzing factors of the Taguchi method and applying finite element analysis to the shape of the die and plug used in monolayered pipe drawing [3][4][5].
In existing research, studies on the mechanical properties for the production of pipes using sheets bonded with dissimilar metals and process improvements are conducted. For the drawing process, research on monolayered pipes is being conducted. However, research on the drawing process using dissimilar materials has not been conducted. Therefore, this study aims to present the optimum shape for drawing dies and plugs with investigations on drawing dissimilar materials using drawing steel that can be used for various applications in the industry and special materials with high corrosion resistance.
The lined pipe made of clad dissimilar materials of carbon steel-stainless steel shows a price difference of about 1.5 to 2 times that of a special steel pipe made of a single CRA. By replacing the required strength of the monolayered special steel pipe with the bilayered materials pipe, it is possible to reduce the weight through-thickness reduction. These manufacturing techniques are widely used at home and abroad as well as in other fields.
The current pipe manufacturing methods using bilayered materials can be divided into metallurgical and mechanical bonding, depending on the bonding method. There are two methods of metallurgical bonding, namely the weld overlay method in which the entire inner wall is welded with a special alloy, and the seam welding method with manufactures a clad plate through rolling. Mechanical bonding is a method of mechanically deforming two pipes by applying pressure at room temperature on hydroforming die to bond them into one tube [6]. Moreover, depending on the bonding method of bilayered materials, the mechanical bonding of the pipe yields lower bonding strength than metallurgical bonding. Therefore, in this study, a new method of drawing both the base material and a CRA at the same time is proposed, rather than a hydroforming process, which is a bilayered bonding pipe manufacturing method. Through this, the production cost can be reduced with decreased process time. In order to overcome the low bonding strength, the typical weakness of mechanical bonding, an analysis by way of the Taguchi method has been performed on the impact of the dies, plugs, and reduction of the area on the bilayered pipe drawing process, deriving the optimum shape. As a comparison for performance verification, a shear strength experiment is performed with products of the same material and dimensions, one with the existing hydroforming process and the other with the drawing conditions of this study. Finally, we aim to verify the comparison and performance advantages of bonding strength through the shear strength experiment.
2. Basic Principles of Bilayered Pipe Drawing
The drawing process is a basic plastic working method that reduces the cross-sectional area and increases the length of the material by passing the material between dies with taper holes. The drawing force acts as an external force, and the die wall surface exerts a compressive force on the material. The drawing process is generally performed at room temperature, and lines and round rods can mainly be obtained using this process. The outer diameter, inner diameter, and pipe thickness are adjusted by drawing the hollow pipe [4][5].
2.1 Tube drawing process
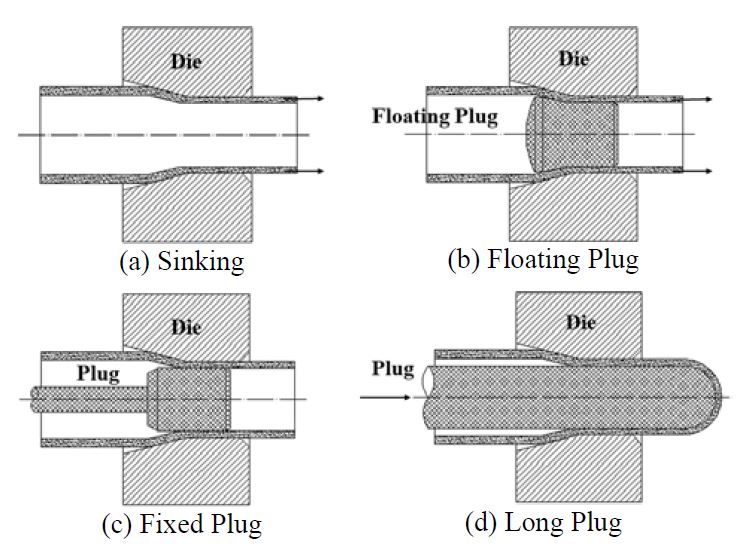
In the tube drawing process, different types of plugs are used to adjust the inner diameter, outer diameter, and thickness of the pipe; Figure 1 (a) shows drawing by means of sinking without a plug, Figure 1 (b, c) shows drawing with a fixed plug or floating plug, and Figure 1 (d) shows a drawing with a long plug [7].
2.2 Bilayered tube drawing principle
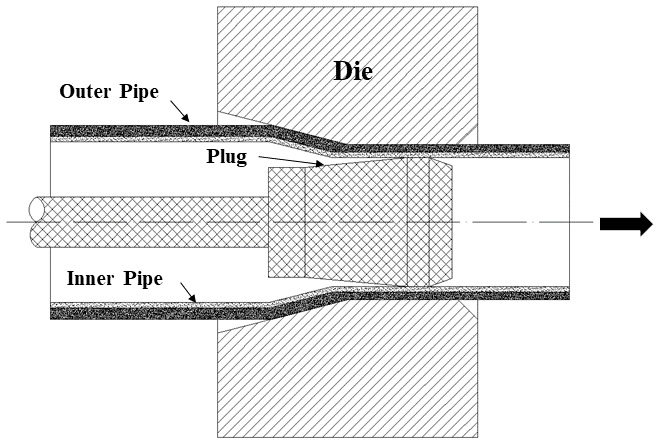
A bilayered tube drawing process is a method that can control the inner diameter, outer diameter, and thickness of a pipe during the simultaneous drawing of two different materials using a stop plug, as shown in Figure 1 (b). Figure 2 shows a schematic diagram of the bilayered materials tube drawing process.
3. Design of Experiments using the Taguchi Method
3.1 Design factors and level determination
Design of Experiments is a technique that efficiently finds the optimum condition of a product by selecting various factors affecting its characteristics and conducting experiments to determine the relationship between those factors [8][9].
The Taguchi method is an optimization technique whose advantage lies in the fact that if there are many factors to consider, the factor that is insensitive to the influence of external noise can be selected by analyzing the factors with a small number of experiments through the orthogonal array table. It uses a loss function to evaluate the performance of characteristic value. When calculating the loss function, the proportional constant k must be determined. The most important information is to determine the Δ0 (function limit) and the loss value ∆0 when the function is not performed. Therefore, when the target value of product characteristics is m, and the actual characteristic value of the product is y,
the quality loss factor is
A product of good quality is obtained on minimizing the value of this loss function. In addition, for factors affecting the variation in performance, the controllable and non-controllable factors are divided, and the concept of noise is introduced. The factors that are noise resistant are selected, and the signal to noise (S/N) ratio is introduced to implement a design that is insensitive to noise.
Multiple factors affect the design of drawing dies, but there exists no research concerning the drawing of bilayered materials. According to “Progress in cold roll bonding of metals for the production of bilayered materials” by Long Li, manufacturing by rolling the bilayered materials plate can increase the bonding strength of the material as the area reduces [10]. Therefore, among the important variables in drawing, the angle of entry of the die and the angle of the plug, which have the greatest influence on the cross-section area reduction, are selected as variables [11]. For this purpose, preliminary analyses were conducted to examine the effect of the die and plug angles on the material drawing and determine the level of design variables, using the commercial analysis program FORGE HPC.
The outer pipe of the test material (Carbon steel) is API X65 5L with ∅ = 114.3 mm, and the thickness is 4.65 mm, 4.7 mm, and 4.75 mm, respectively. The inner pipe is a stainless steel-based SUS316L material with ∅ = 101.6 mm, with a thickness of 2 mm. The final dimension after drawing is ∅ = 101.55 mm and a thickness of 6.6 mm.
The flow stress equation was derived, based on the material properties obtained, according to the FORGE HPC manual. The factor of each equation is a calculated constant, a dimensionless number, and an experimental value derived from material properties. Table 1 and Table 2 show the mechanical properties and chemical composition, respectively, including the derived values [12][13].
| (1) |
A : consistency
m1 : Temperature Term
m2 : Sensitivity
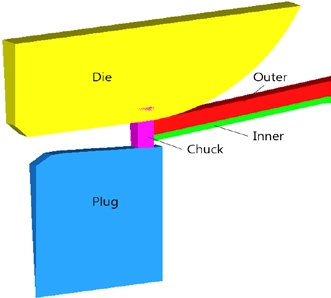
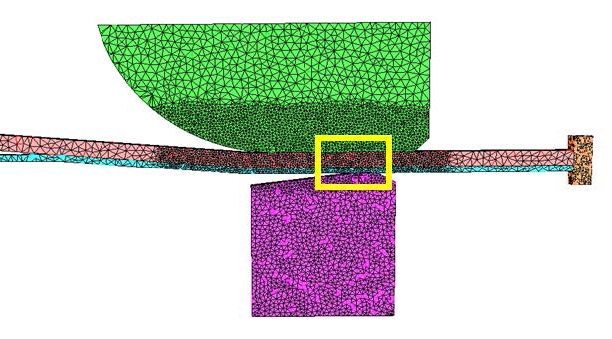
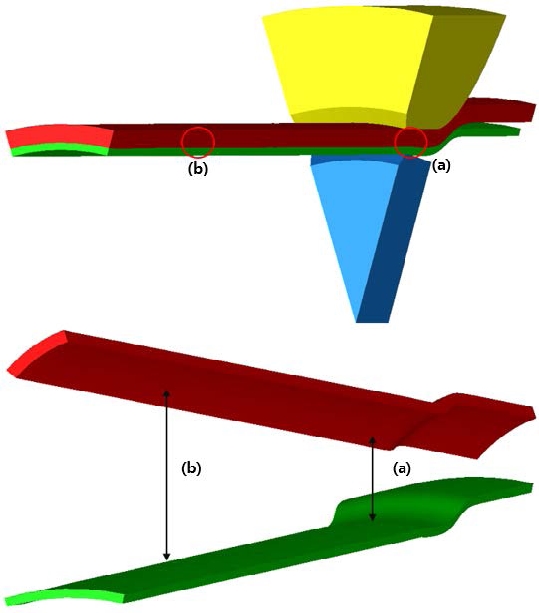
For the analysis conditions, the modeling was performed with the shape, as shown in Figure 3, and it was assumed that the die, plug, and chuck were rigid bodies, thereby exhibiting no deformation. Since the billet of the material was thin, the size of the mesh grid was rather small, so the number of material points increased, and analysis efficiency decreased, which increased the analysis time. Therefore, a mesh window was used to form for dense elements, as shown in Figure 4, for the region of interest only with an element size 0.7 times the size of the existing element at the molding position. The friction between each material, die and plug is assumed to be in the lubricated state with coulombic friction (μ) 0.2. Through the literature review, for the friction at the interface between the two materials, the static friction coefficient was found to be 0.74 - 0.8 for friction between steel on steel, and the static friction coefficient was set to 0.74 for the experiment [14].
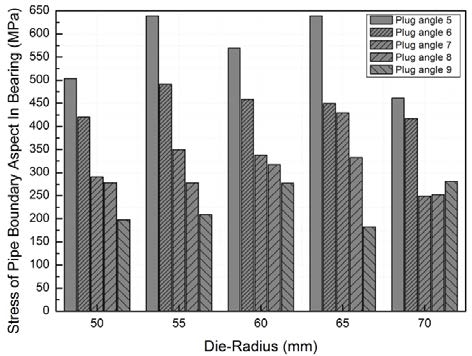
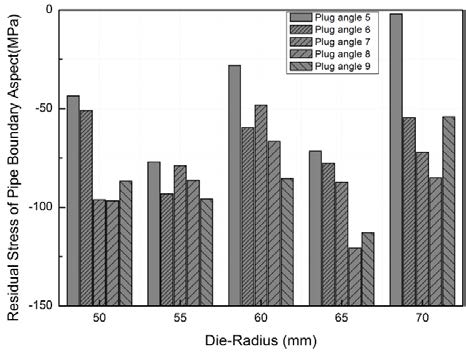
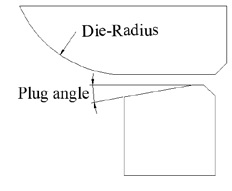
The result data was used to determine the design factors and levels. Figures 5 and 6 are the results of stress analysis at the positions indicated in Figure 4. The die boundary conditions of the pre-analysis are shown in Table 3, and the operating condition of the existing steel pipe manufacturing was applied. As shown in the graph, the maximum stress value was obtained with the die radius between 55 and 60 mm and the plug angle measured at 5 °.
Variables were selected through pre-analysis results, and the level of the design factor was determined to be at three levels considering the process compared to the level applied to the initial design [9]. Table 4 shows the design factors selected and the level of each design factor. These factors are: A (Die radius), B (Plug angle), C (Pipe cross-section area), and D (friction coefficient).
3.3 Design of experiment
Data that can be investigated by means of finite element analysis are stress, strain, and shape dimensions that can be observed from the materials. Through the above variables, the radial stress values measured at the interface between the two materials are identified, and through this data, the effects on the material according to the shape are analyzed.
As shown in Table 5, the factors and levels used in this study are three design factors with three levels. For the minimum orthogonal array table that can be applied, a model with a total of 8 degrees of freedom L9(43) should be applied. In Table 4, A, B, C, and D indicate design factors and the Arabic numerals indicate the level of design factors. That is, the experiment number 1 of Table 5 is expressed as A1B1C1D1, and experiment number 9 is written as A3B3C2D1 [8].
3.4 Conditions of finite element analysis
Based on the boundary conditions of the pre-analysis, a new model was applied, according to the orthogonal array, to perform a total of nine analyses. The physical properties are the same as those of Table 1 and 2, and the drawing process conditions are also the same as Table 3. However, the die shape (Die Radius, Plug Angle) of Table 3 was changed to the conditions in Table 5 to conduct the analysis.
3.5 Results and analysis of the finite element analysis method
Experimental conditions were obtained by means of the orthogonal array according to the level between each factor in the orthogonal array table using the Taguchi method, and a finite element analysis was performed nine times using FORGE HPC.
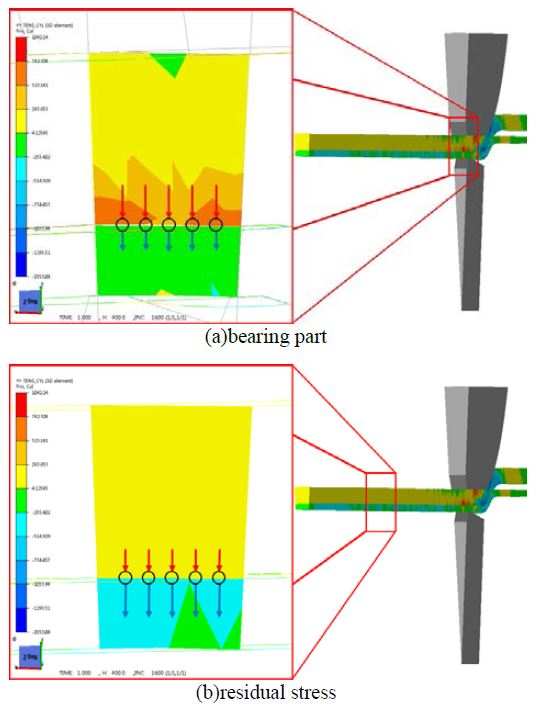
As a result of the analysis, the stress in the radial direction applied at the interface between the outer and inner pipes at the (a) bearing part and the (b) residual stress part of the interface of the material was examined, as shown in Figure 7. As shown in Figure 8, in the cross-section of the bearing part (a), the material is under tensile stress at the interface of the outer pipe of the material, and under compressive stress at the interface of the inner pipe of the material, and the tensile stress at the outer pipe is higher than the compressive stress at the inner pipe. In (b) residual stress part, as in the case of the bearing part, tensile stress is applied at the outer pipe, and compressive stress is applied at the inner pipe. However, unlike the case of the bearing part, the tensile force in the outer pipe is mostly lost, leading to higher compressive stress in the inner pipe than the tensile stress of the outer pipe.
Therefore, to increase the bonding strength between the two materials, it is necessary to have high circumferential stress at the interface between the materials.
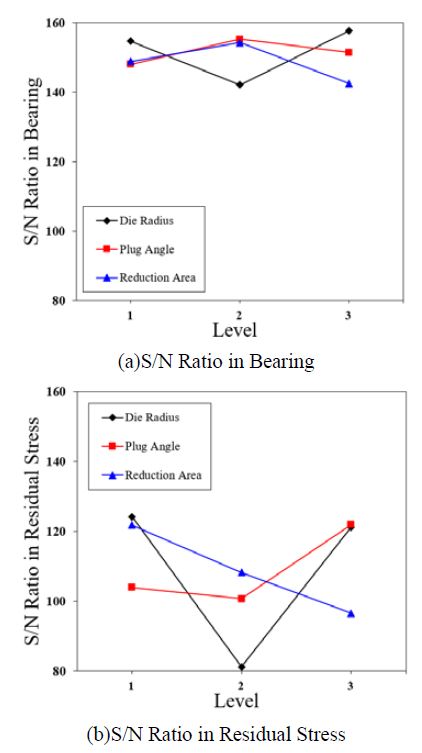
Table 6 and 7 show the total stresses of the outer and inner pipes at the bearing and residual stress parts. Using the larger-the-better characteristics equation, the S/N ratio by level for each factor was obtained, and these are shown in Table 8 and 9. The tendency, by level, for each better at the bearing part and the residual stress part is shown in Figure 9. In the graph, a similar tendency was observed for the die radius and reduction of area at the (a) bearing part and the (b) residual stress part; however, the tendency of the plug angle is slightly different. S/N Ratio of the-larger-the better characteristics:
| (2) |
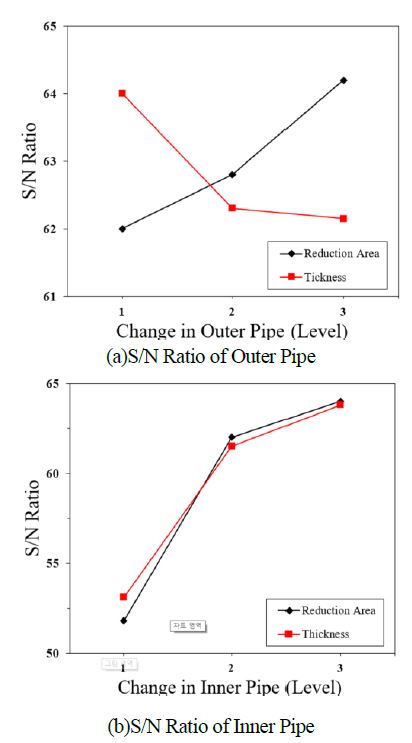
The reduction of area tended to decrease as the level increased from Level 1 to Level 3. In Figure 10, when the change in the reduction of the area and thickness were examined in the (a) outer pipe and (b) inner pipe, the reduction area, and the thickness change both increased with the level in the inner pipe.
However, in the case of the outer pipe, with the application of the tensile stress, the material became thicker, the reduction area decreased, and the thickness change increased.
Through the analysis of the variance of the S/N ratio, the effects were divided into the input effect of the response values and the remaining effect. We aim to use the ratio of the two effects in the design evaluation. The results of the analysis indicate that, in the residual stress part, the values are significantly affected by the die radius; however, they are not significantly affected by the plug angle and reduction area. On the contrary, for the bearing part, it is assumed that the values were significantly affected by the plug angle and reduction area but not by the die radius. This can be observed in the analysis of variance shown in Table 10 and 11 and can also be confirmed by the contribution ratio expressed as a percentage against the sum of all level differences obtained through the S/N ratio for each level.
Therefore, the level of the die radius in the residual stress part, level of the plug angle and reduction area in the bearing part was selected, which was 55 mm for the die radius, 5 ° for the plug angle, and 11.62% for the reduction of area.
4. Verification through Experiment
4.1 Experimental materials and drawing conditions
The experiment was conducted under the optimum conditions of the factors obtained through the Taguchi method. As for the experimental materials, for the outer tube (carbon steel), API X65 5L was used, with ∅ = 114.3 mm and thickness = 4.7 mm. For the inner tube (stainless steel), SUS316L was used with ∅ = 101.6 mm and thickness = 2 mm, and the mechanical properties and chemical composition of each material are as shown in Table 1 and 2. The die radius and the plug angle used for the experiment were at 55 mm and 5°, respectively.
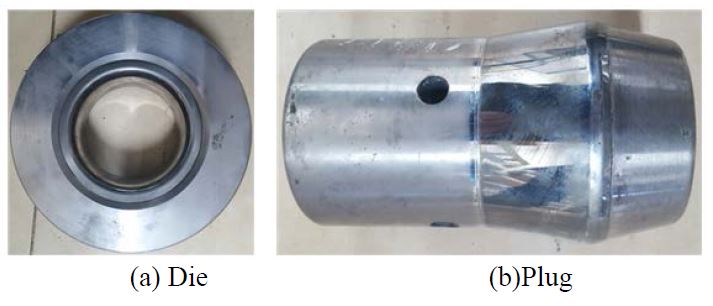
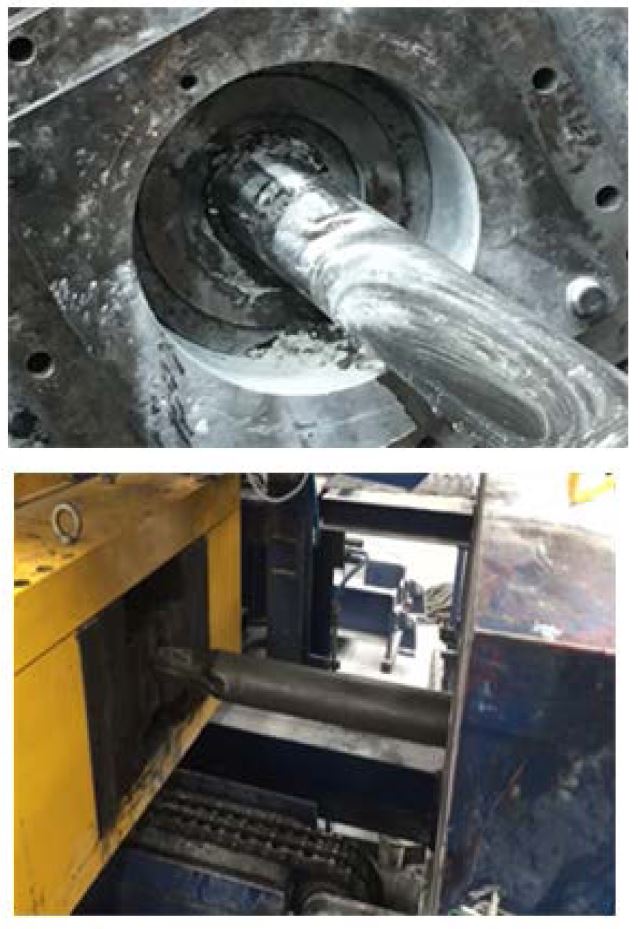
Figure 11 shows (a) die and (b) plug fabricated by means of the previous optimization design. As a process to use both materials for the experiment, to draw both the outer and inner pipes at the same time, the two materials are fixed at the same time. Then, the materials were placed on the drawing tool, inserted into the die, and a dry lubricant was used to reduce the friction between the die, plug, and the materials. Once the plug is inserted, the fixed material is pulled to carry out the forming. Furthermore, since the lengths of the initial materials are different, and the tensile length of the two materials are also different, shear processing at the ends is required. Figure 12 presents the drawing process; (a) is the shape in which the dies and the material are bonded with the lubricant applied to the material, and (b) is the process of performing drawing.
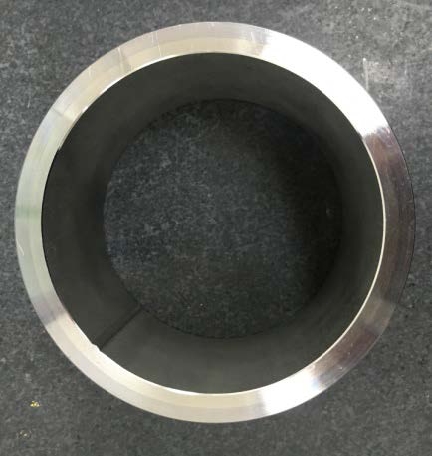
The final target dimension is ∅ = 101.55 mm, and the thickness is 6.6 mm, as indicated above. As the experiment was performed using the optimal value obtained through the Taguchi method, it was found that ∅ = 101.52 mm and the thickness was approximately 6.56 mm. The application of a tensile force on the material was assumed to slightly reduce the cross-section area. As shown in Figure 13, the bonding of the final product was intact or and no other defects were observed.
4.2 Bilayered pipe indentation strength test
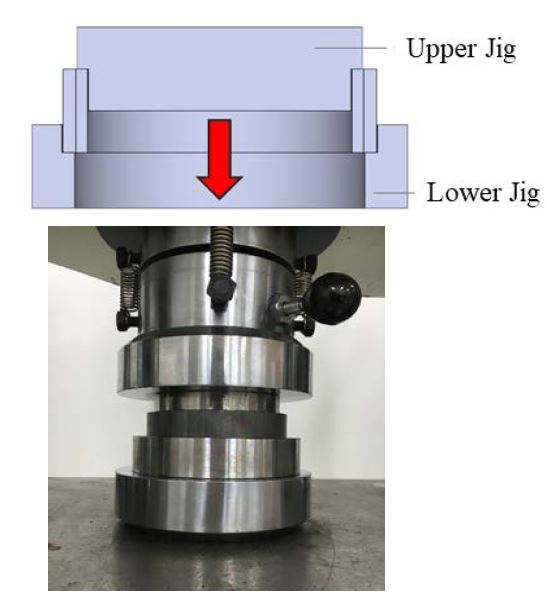
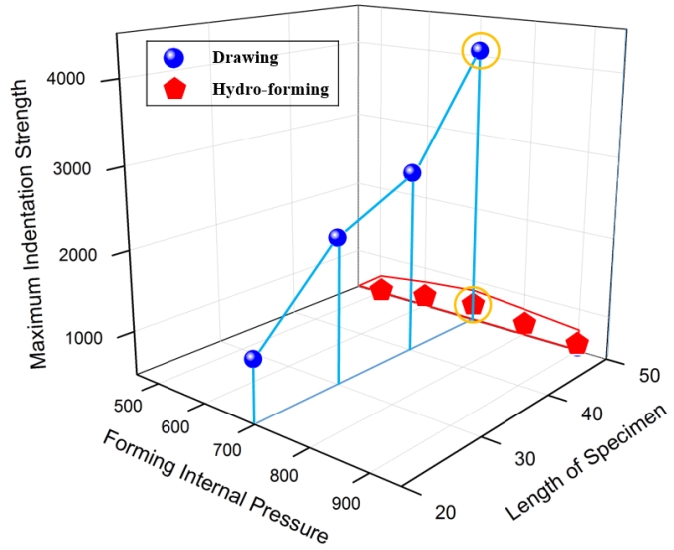
A prototype was produced, as shown in Figure 13, using the results obtained through optimal design, and indentation strength tests were performed. To measure the indentation strength of the bilayered material pipe, an experiment was conducted by placing the specimen on the lower jig of the universal testing machine and pressing the upper part of the specimen with the upper jig to push the inner pipe inside the outer pipe. The schematic diagram of the indentation strength test, an image while performing the test with the jigs, and the specimen bonded to the universal testing machine is shown in Figure 14. As for the experimental method, the force required in the upper jig was measured to indent 10 mm for each specimen of 20 mm, 30 mm, 38 mm, and 50 mm, respectively. The indentation strength result of the bilayered pipe manufactured through the hydroforming method, which is a product to be compared against for this study, and that of the bilayered pipe fabricated in this study were compared. The dimensions and materials used were the same as those used in the drawing process of this study. Table 12 shows the results of measuring the force that is required to indent 10 mm on the specimen with a height of 50 mm for the bilayered pipe with the specimen fabricated according to the forming pressure of the hydroforming process. Table 13 shows the indentation strength test result according to the material length of the bilayered drawing pipe. When comparing the values at a specimen length of 50 mm, as shown in Figure 15, the maximum indentation strength obtained from the bilayered drawing pipe was almost eight times higher than that obtained through the hydroforming process. At the interface between the inner and outer material, the penetration of the shape is thought to have occurred due to friction between the materials and the reduction of the cross-sectional area, which increased the bonding strength and resulted in a higher indentation strength.
5. Conclusion
In this study, steel pipes with dissimilar metals, obtained through the cold drawing process of bilayered materials, were manufactured. This process was carried out by obtaining the shape and dimensions of the die, plug, and reduction area that could, in turn, increase the bonding strength between the two materials. The orthogonal array of the Taguchi method was used to reduce the number of experiments and coupled with finite element analysis, the effects of the stress applied at the interface of the two materials were analyzed using the S/N ratio and shape. Accordingly, individual factors for each level were considered for the design. Experiments were conducted with the designed shape and through the comparison with the conventional process. The following conclusions have been arrived at regarding the proposed method.
- 1. The effects on the factors affecting radial stress at the interface between the two materials of a bilayered drawing pipe were analyzed by means of the Taguchi method. It was shown that in the bearing part in which the cross-section area of the material is reduced, the values were significantly affected by the plug angle and the thickness change of the outer pipe. In the residual stress part, the values were significantly affected by the die angle. The optimum shape derived was as follows: die radius of 55 mm, plug angle at 5 °, and for the reduction of area, when the thickness of the outer pipe was 4.65 mm, a significant change in the thickness was observed.
- 2. In the hydroforming process, the size of the equipment increases as the length of the pipe increases. However, the drawing process in this study can be constructed using the same die and system size, so that the process is unaffected by the length of the pipe.
- 3. The lined pipe fabricated through bilayered pipe drawing in this study shows higher performance with indentation strength eight times higher than the existing lined pipe manufactured by means of the hydroforming method. Therefore, the product fabricated by the proposed method has high bonding strength compared to the product manufactured by the existing hydroforming method and it is considered to possess excellent structural stability and internal pressure capacity.
Acknowledgments
This research is a project carried out with the support of BISTEP (R&BD project of industry association for local excellent researchers) with the resources of Busan Metropolitan City.
[Project identification number] B0080419002392[Government Department] Busan Metropolitan City Hall[Research project] R & BD project for business connection with excellent local researchers[Research Title] Development of automobile engine exhaust system flange manufacturing process through high aspect ratio/composite shape cross section drawing technology[Research Management Institution] Busan Innovation Institute of Industry, Science and Technology Planning[Contribution Rate] 60/100[Host institution] Dong-A University Industry-Academia Collaboration Foundation[Participating institution] Rhinox Co., Ltd.[Research Period] 2019.03.01. - 2019.11.30.
Author Contributions
Conceptualization, J. H. Park; methodology H. Choi; Formal Analysis, H. Choi and M. T. Ahn; Investigation, S. H. Ha; Resources, H. Choi and M. T. Ahn; Data curation S. H. Ha; Writing-Original Draft Preparation, H. Choi; Writing-Review & Editing, J. H. Park; Visualization, S. H. Ha; Supervision, J. H. Park; Project Administration, J. H. Park.
References
- J. W. Park, A Study on Characteristics of Weldments according to the Post Weld Heat Treatment of Hot-rolled Clad Steel, Ph.D. Dissertation, Department of Nano-micro mechanical system, Seoul National University of Science and Technology, Korea, 2015 (in Korean).
- H. J. Kim, A Study on Effect of Post Weld Heat Treatment Parameters on Hardness of Overlay Weldment in Monel 400, Master Thesis, Department of Manufacturing technology, Ulsan University, Korea, 2013 (in Korean).
-
X. Wang, P. Li, and R. Wang, “Study on hydro-forming technology of manufacturing bimetallic CRA-lined Pipe,” International Journal of Machine Tools & Manufacture, vol. 45, no. 4-5, pp. 373–378, 2005.
[https://doi.org/10.1016/j.ijmachtools.2004.09.015]

- K. J. Tak, Effects of Drawing Parameters on Mechanical Properties of BAS121 Alloy Tubes for Heat-exchangers by High Frequency Induction Welding, Master Thesis, Department of Materials Engineering, Sunchon National University, Korean, 2004 (in Korean).
- H. D. Kim, D. J. Kim, and B. M. Kim, “Process design of multi-step wire drawing using artificial neural network,” Transactions of Materials Processing, vol. 7, no. 2, pp. 127-138, 1998 (in Korean).
-
S. Y. Yu, H. S. Choi, S. K. Lee, and D. K. Kim, “Trend and review of Corrosion Resistant Alloy (CRA) for off-shore pipeline engineering”, Journal of Ocean Engineering and Technology, vol. 28, no 1, pp. 85-92, 2014 (in Korean).
[https://doi.org/10.5574/KSOE.2014.28.1.085]

- D. Y. Lee, Technology of Plasticity, 3rd ed., Korea, Munundang, 2005 (in Korean).
- S. B. Lee, Easy Taguchi Design, 2nd ed., Korea, Sangjosa, 2003 (in Korean).
- H. J. Lee, S. W. Yoo, B. H. Choi, and H. J. Yu, “Application of Taguchi’s method to the prediction of speed endurance of tires,” pp. 454-459, Proceedings of the Korean Society of Automotive Engineers Spring Conference, pp. 454-459, 1996 (in Korean).
-
L. Long, K. Nagai, and F. Yin, “Progress in cold roll bonding of metals,” Science and Technology of Advanced Materials, vol. 9, no. 2, 2008.
[https://doi.org/10.1088/1468-6996/9/2/023001]

-
J. J. Sheu, S. Y. Lin, and C. H. Yu, “Optimum die design for single pass steel tube drawing with large strain deformation,” Procedia Engineering, vol. 81, pp. 688-693, 2014.
[https://doi.org/10.1016/j.proeng.2014.10.061]

- HYUNDAI STEEL Product Guide, 2015 (in Korean).
- FORGE HPC USER GUIDE, 2009 (in Korean).
- Polytechnic, “Static and Kinetic Friction” RAISE (in Korean).

